Electronic Queue
Publication date: February 5, 2025
Last edited: June 17, 2025
(Added: Widget Constructor for Terminal and Screen, Statistics, The event log)
Electronic queue is an online service integrated into IT-Screen that enables formalized and optimized visitor flow management. The main goal of the electronic queue system is to guide visitors purposefully within an organization and to collect information about the most in-demand services, their delivery time, and other statistical data.
General Overview of the Electronic Queue
This section presents (as an example) the minimum required configuration of a traditional electronic queue system. The IT-Screen online platform, built on WEB technology, is so flexible—both in software and hardware—that the system can consist of just a single smartphone.
Composition of a traditional electronic queue
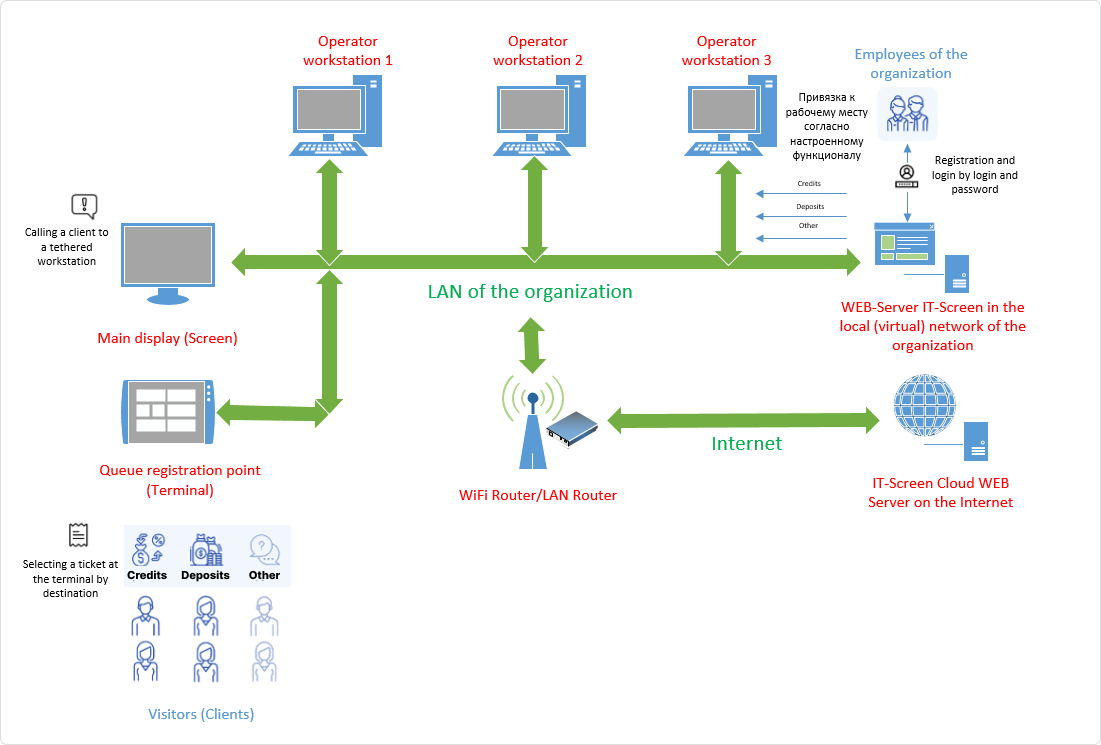
The queue registration point (Terminal) is a device that allows the visitor to select a service and receive a queue number (a ticket with a number).
Main board (Screen) is a device located in the waiting area and used to display the current status of the queue. As a rule, it displays the list of the last called visitors in FIFO order (“first in, first out”)
Operator console (operator workstation) is a software used to call visitors from the queue, it also allows to redirect the visitor to another operator or to finish the service.
Content Management System is a hardware and software solution that complements the functionality of the electronic queue. This system allows centralized processing of various data, such as video recordings, audio recordings, graphic images, for their subsequent output according to the schedule on the main boards (screen). Such a system, for example, can be used for advertising, currency exchange rates, weather, public transportation schedules and any other content.
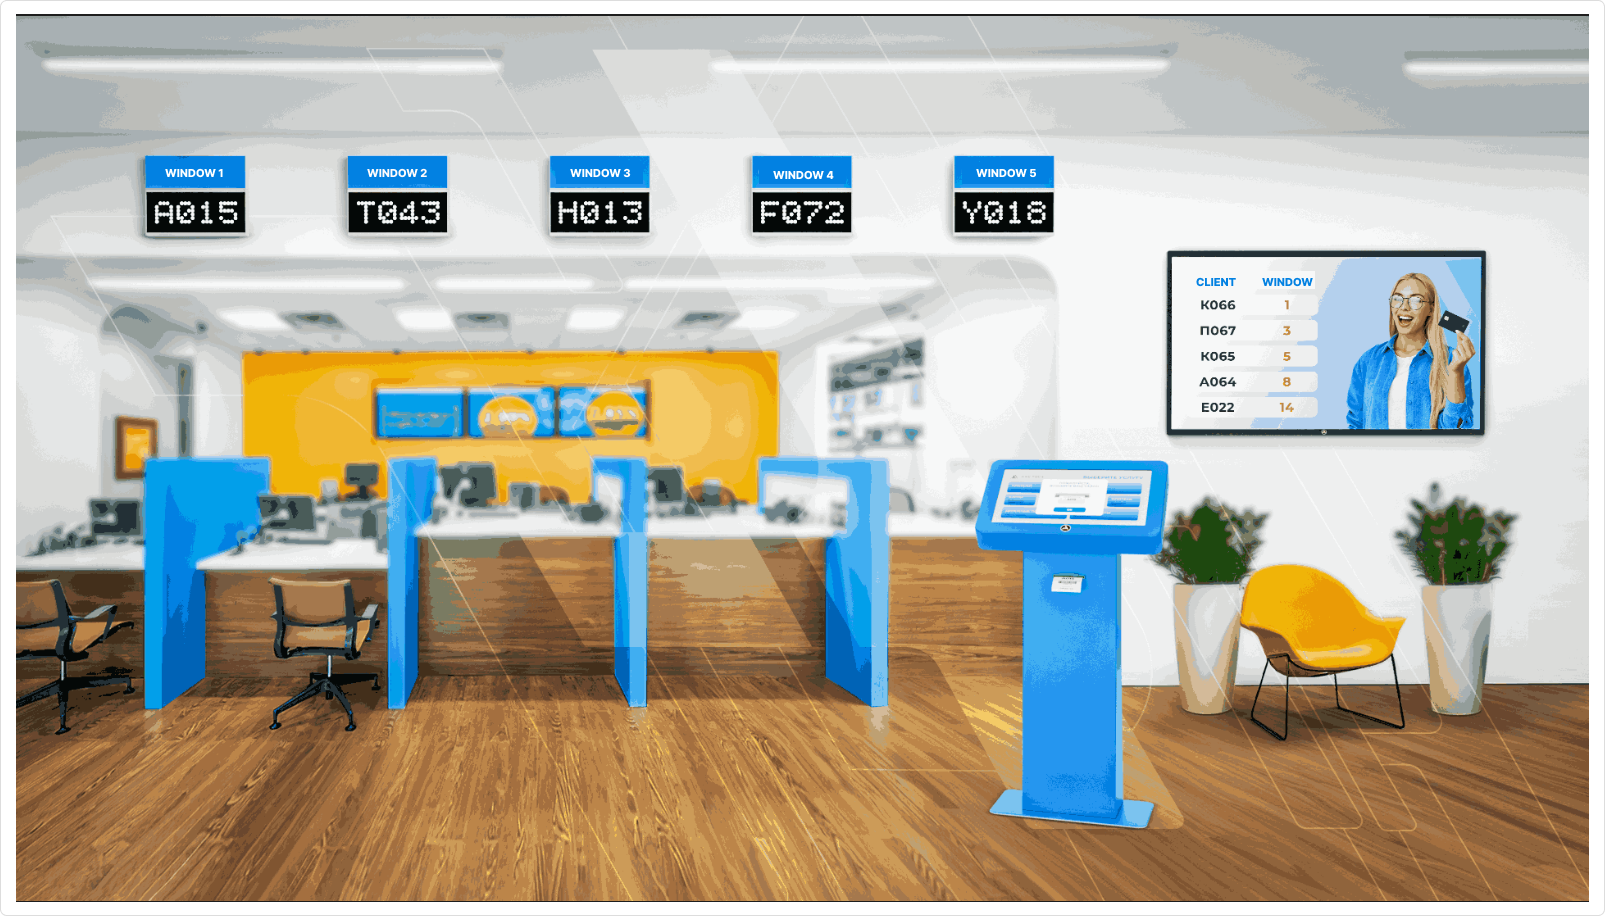
Normal view of an organization's electronic queue.
Architectural (structural) diagram of a conventional electronic queue
Scheme of electronic queue on the basis of Online-platform IT-Screen
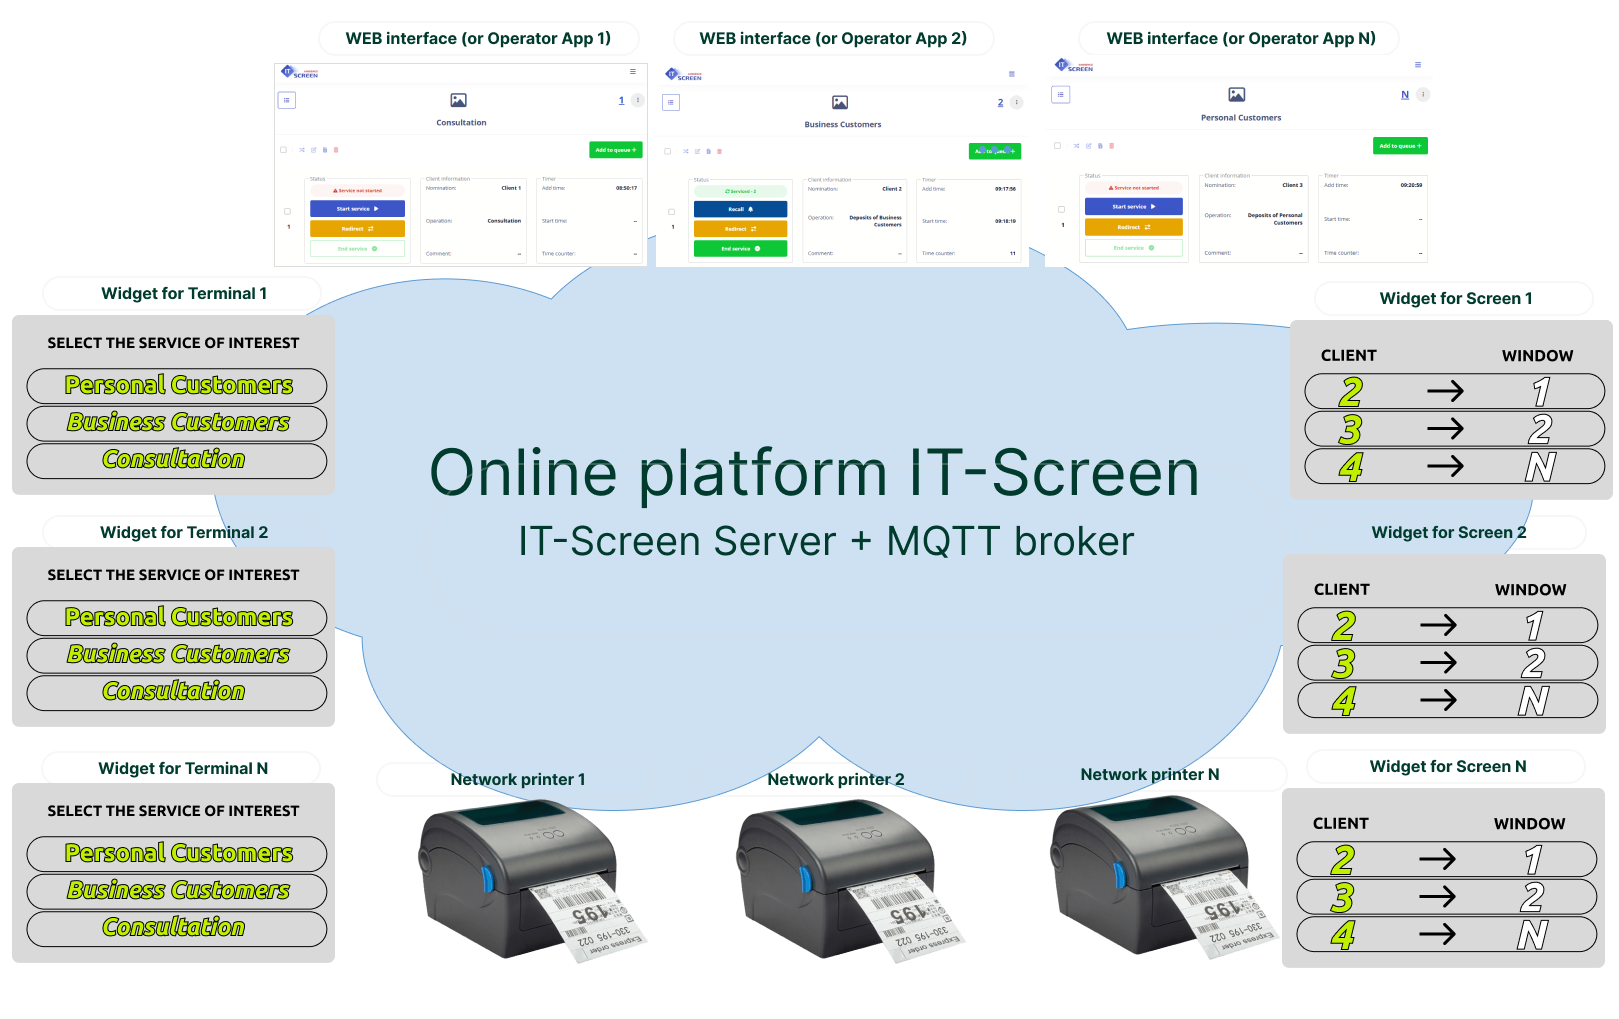
IT-Screen's online platform, built on WEB technology, is so flexible, both in software and hardware. IT-Screen Queue can be deployed and configured by yourself using these instructions. In the most minimal configuration, you only need to have a computer, tablet or smartphone.
To describe the processes and events occurring in the electronic queue on the IT-Screen online platform, the following terms are used:
- Operation – a Library item of type "Electronic Queue" with a set of tags used to link to a service. Operations are not nested.
- Service – a Karmik of type "Electronic Queue". Can include nested operations.
- Electronic Queue Administrator – an experienced user or staff member responsible for configuring the electronic queue.
- Operators – employees of the organization serving the visitors (clients).
- Visitors – clients of the organization using the electronic queue services.
Setting Up the Electronic Queue
The following functionality description is based on IT-Screen software terminology.
It is assumed that user registration (organization operators), operator assignment to the parent organization, and device registration on the IT-Screen network have already been completed.
Users (operators, system administrators) are expected to be familiar with IT-Screen concepts like Karmiks, tags, layouts, windows, etc.
1. Creating Karmiks for Terminal and Screen (Constructor)
The constructor for terminal and screen widgets is available starting from version 8.3.195 of the software.
It is recommended to perform the initial electronic queue setup under the Electronic Queue Administrator account, referred to here as AdminKass.
In the Karmiks menu, create two Karmiks: one for the terminal and one for the screen.
If more devices are planned, create a corresponding Karmik for each (terminal and/or screen).
1) Enter a name for each Karmik (Terminal, Screen).
2) Screen display type — select Karmik
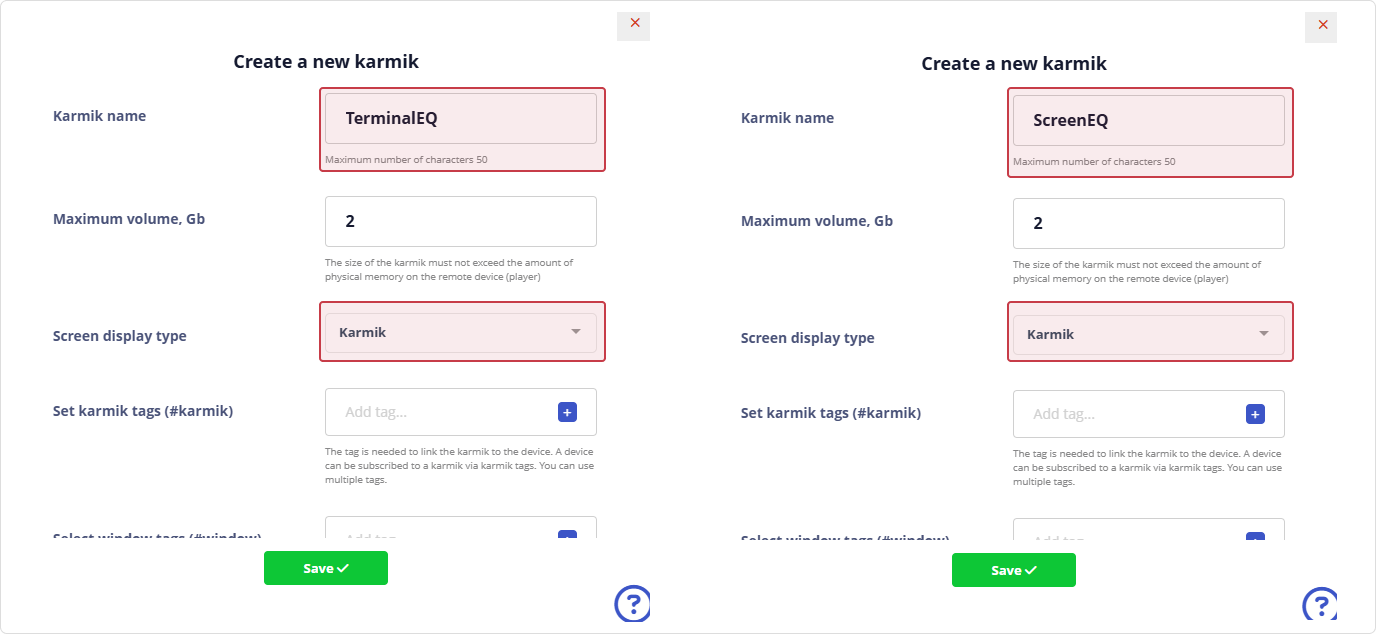
3) After filling in the required fields, click the button.

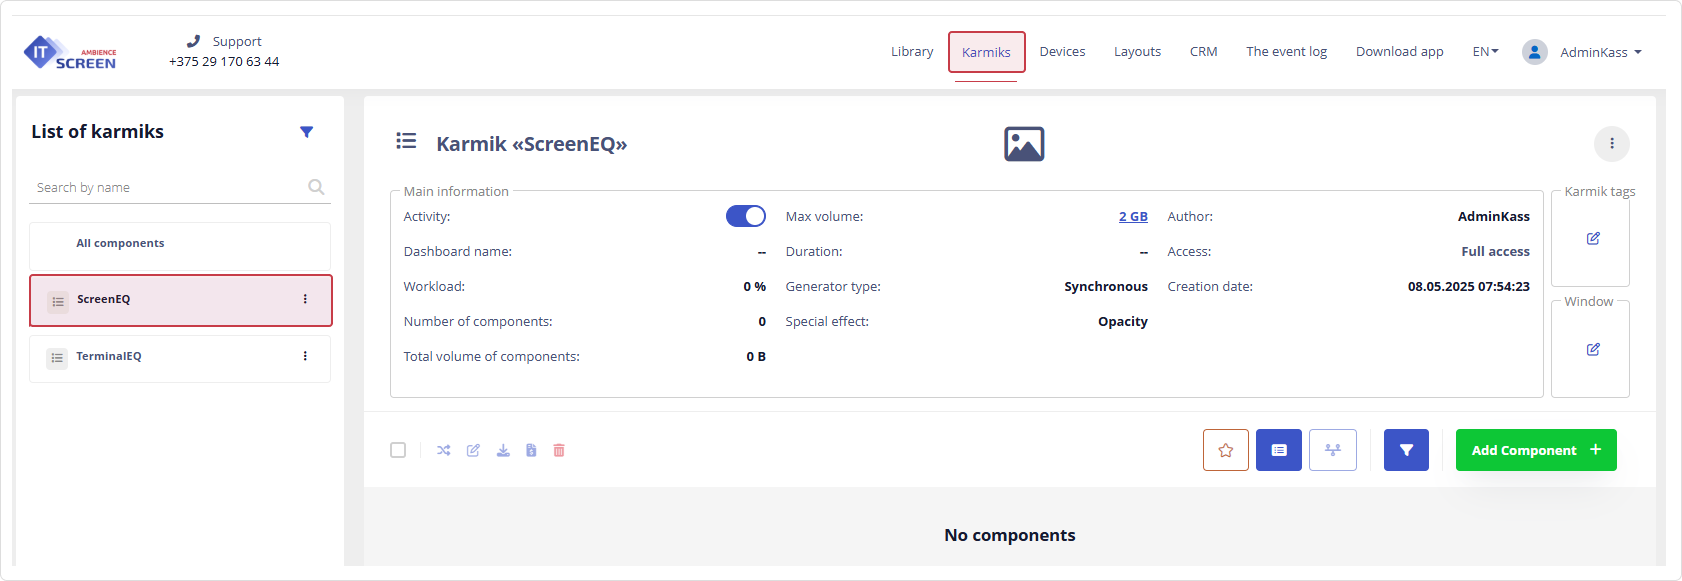
4) In the Terminal Karmik, create a Terminal widget — click the button.
5) From the list, choose Terminal Widget EQ, enter a name, and fill in the remaining fields using the widget constructor.
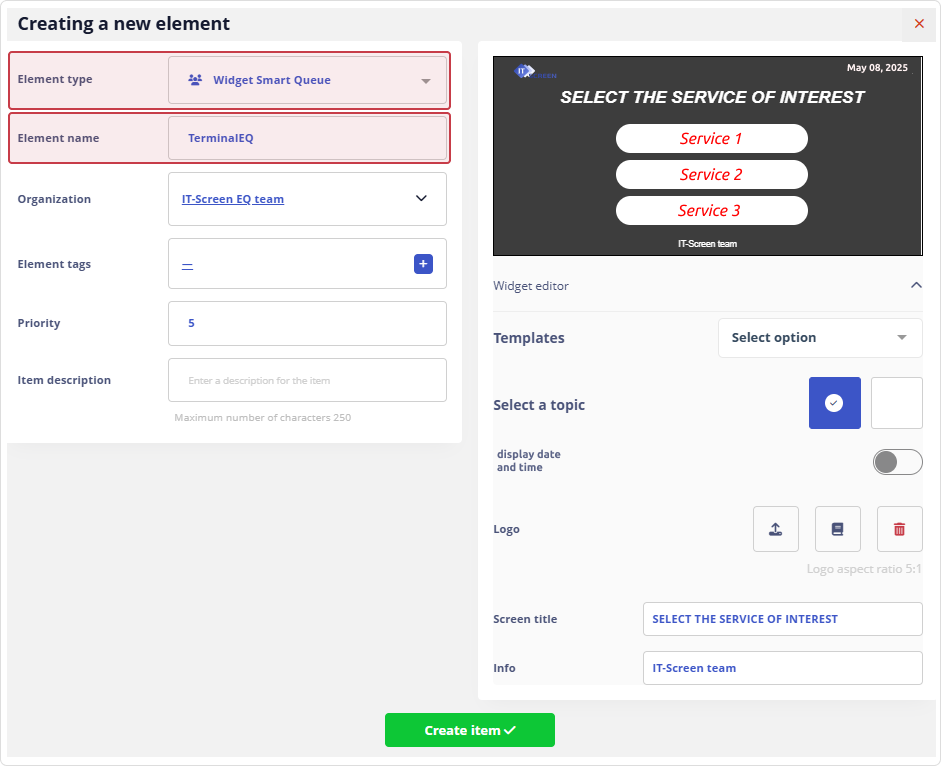
The Terminal Widget Constructor for the electronic queue allows configuring:
• One of two button display templates (rounded or rectangular button style, font, text color).
• Theme – dark or light.
• Whether to show date and time on the terminal.
• Upload a company logo.
• Create a terminal header.
• Optionally add extra information at the bottom of the terminal screen.
6) Click the button.
7) Assign the corresponding Window and Karmik tags to the Terminal Karmik.
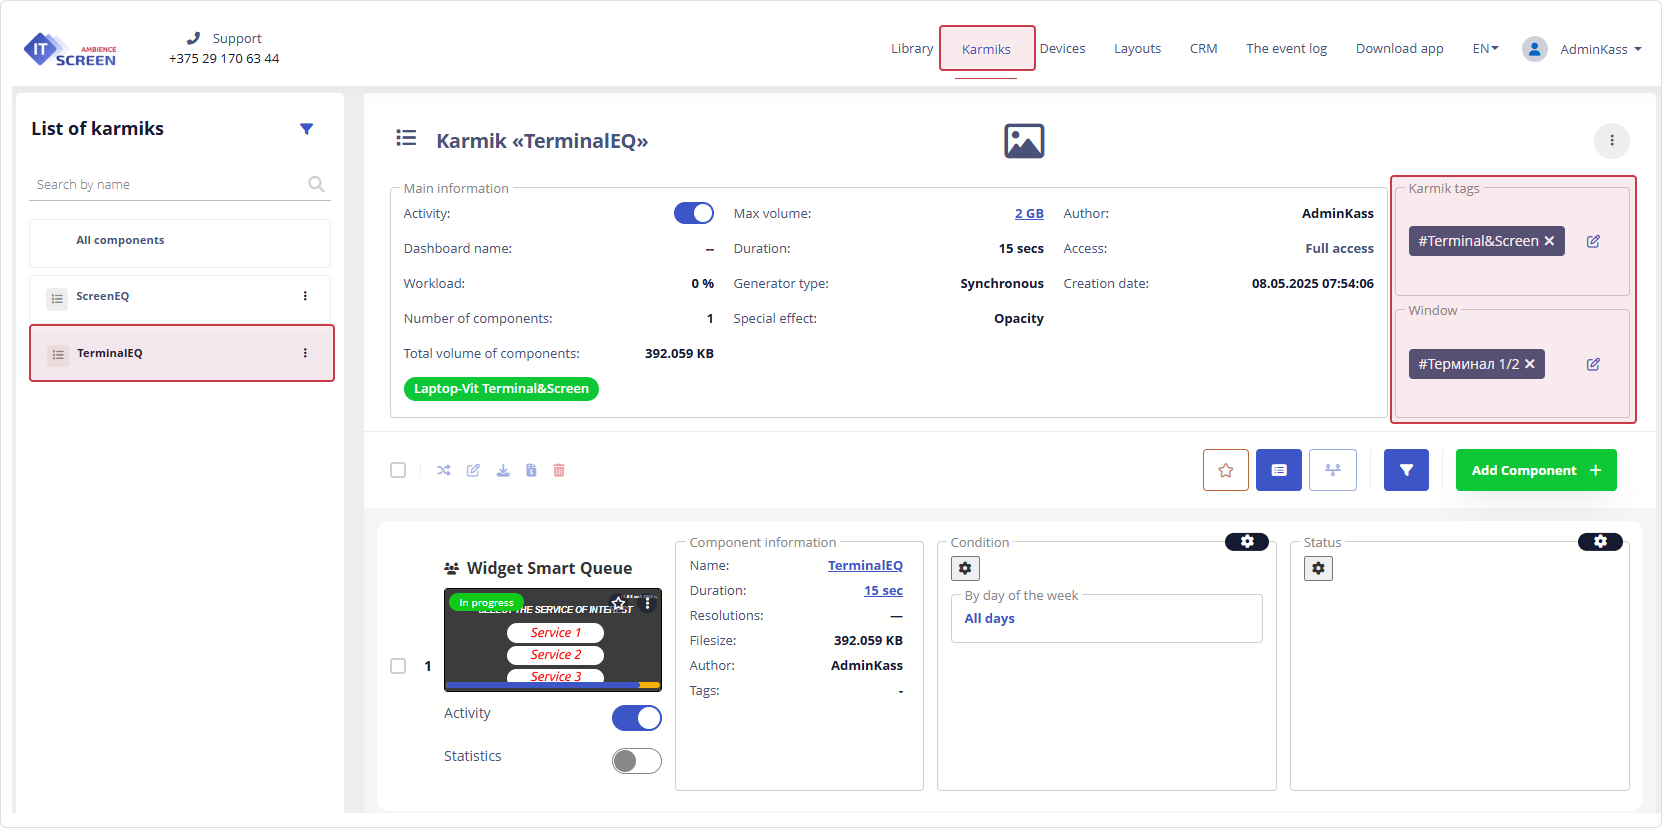
8) Similarly, create a Screen widget for the electronic queue, but select Screen Widget EQ as the element type.
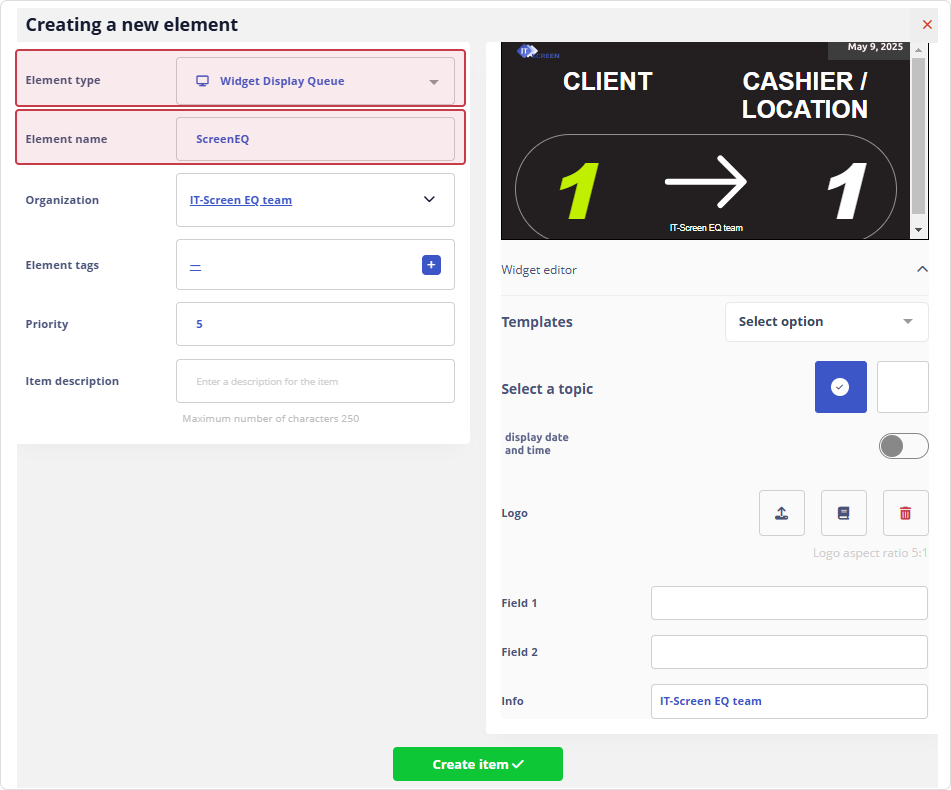
The Screen Widget Constructor for the electronic queue allows configuring:
• One of two button display templates (rounded or rectangular button style, font, text color).
• Theme – dark or light.
• Whether to show date and time on the screen.
• Upload a company logo.
• Field 1 – replaces the client header
• Field 2 – replaces the service counter header
• Optionally add extra information at the bottom of the screen.
9) Assign the corresponding Window and Karmik tags to the Screen Karmik.
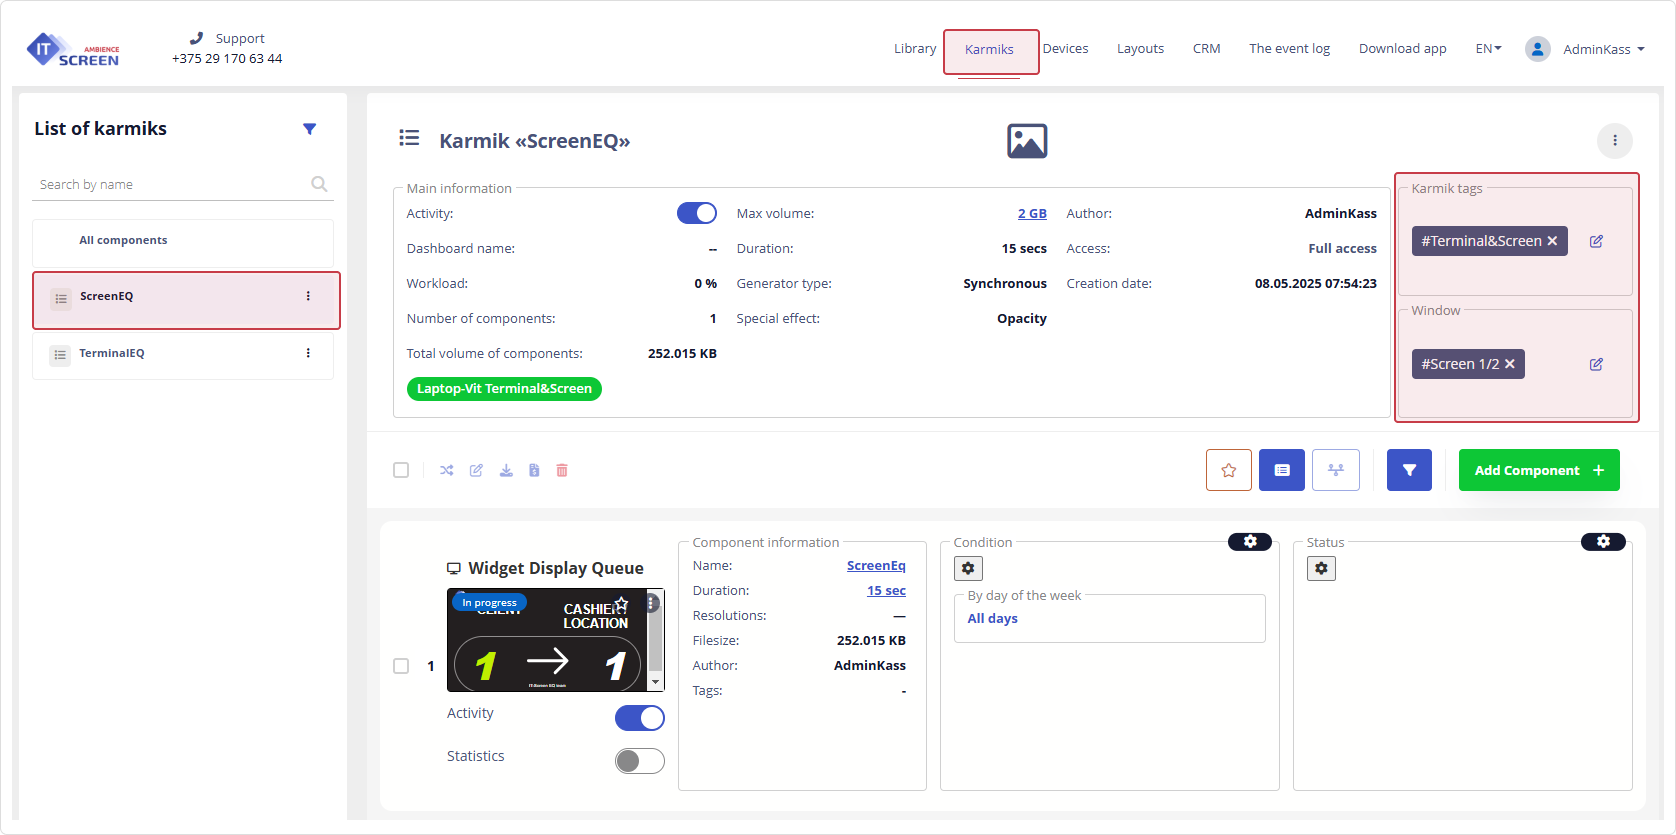
The Terminal and Screen Karmiks are now ready to be deployed (subscribed) to devices.
The software is currently being improved to support custom visual settings for the Terminal and Screen, such as uploading logos, selecting background colors, button colors, and fonts.
2. Devices. Device Configuration. Subscribing to Terminal and Screen Karmiks
In the Devices menu, all devices (or even just one device) intended for use in the electronic queue system must be subscribed to the corresponding Karmiks.
In the classic setup, a minimal electronic queue system includes two devices:
- Terminal – the device used by the client to select a service and receive a queue ticket.
- Screen – the device located in the waiting area used to display the current queue status.
In this guide, a single device will be used as an example to demonstrate the flexibility and convenience of the IT-Screen software for users.

For the terminal and screen to function correctly, each device must specify the user account under which the electronic queue is configured.
In this guide, the user is AdminKass.
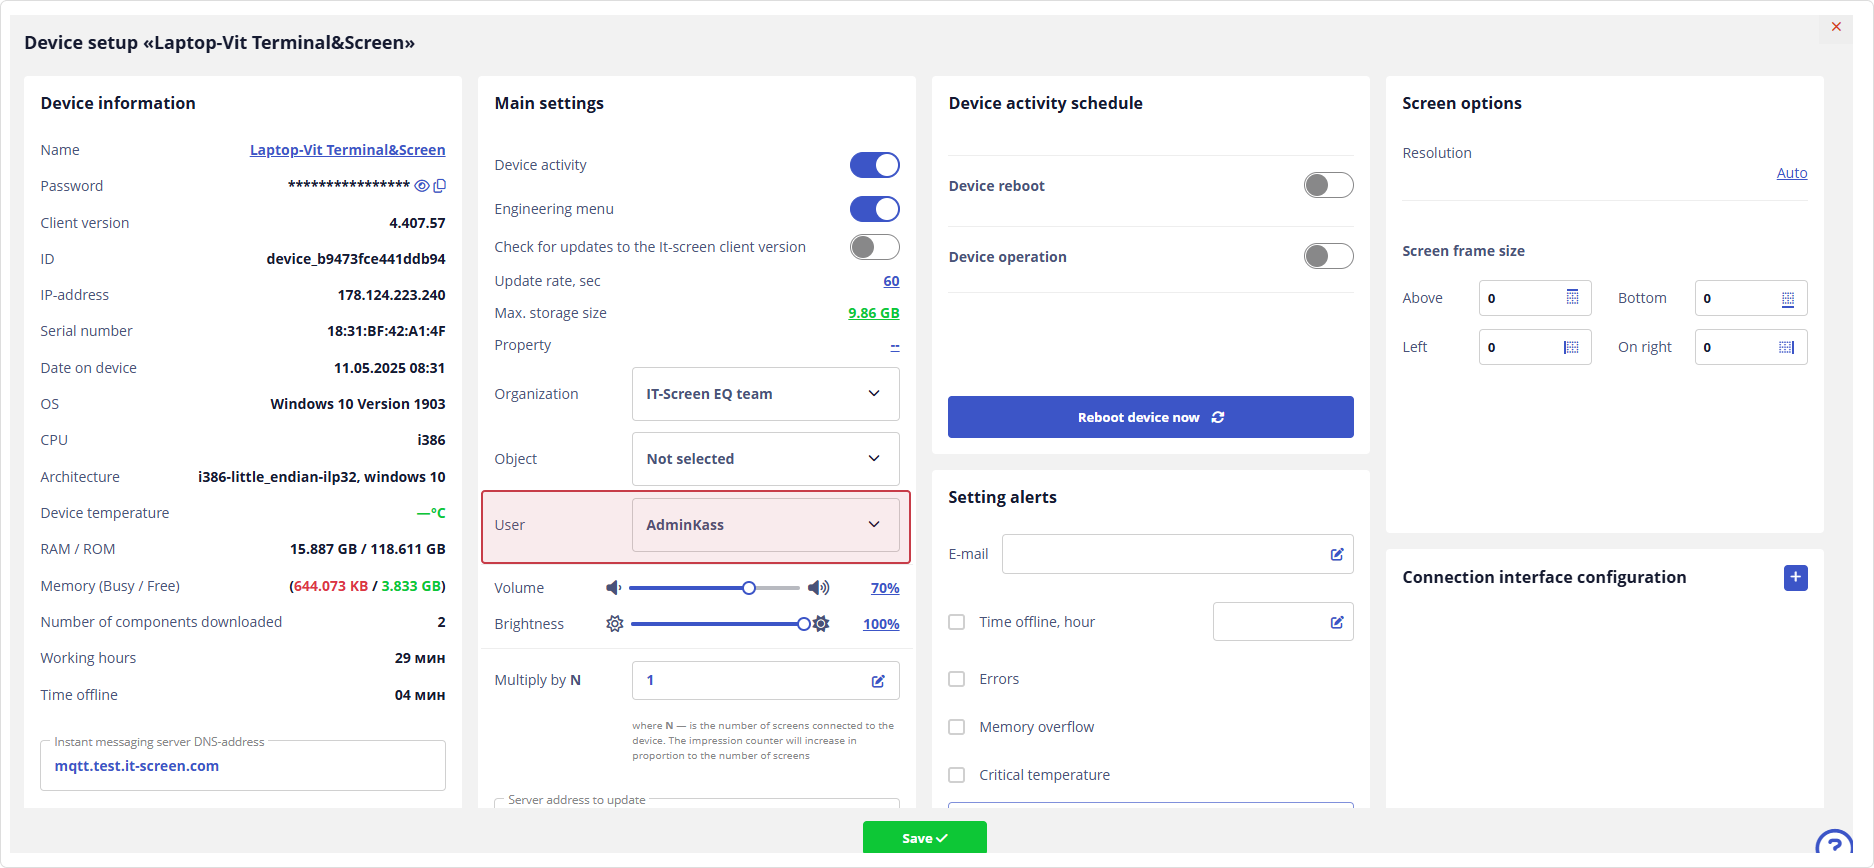
Device configuration and Karmik subscription are described in detail here.
If everything is set up correctly, the devices will display the following information on the screens:
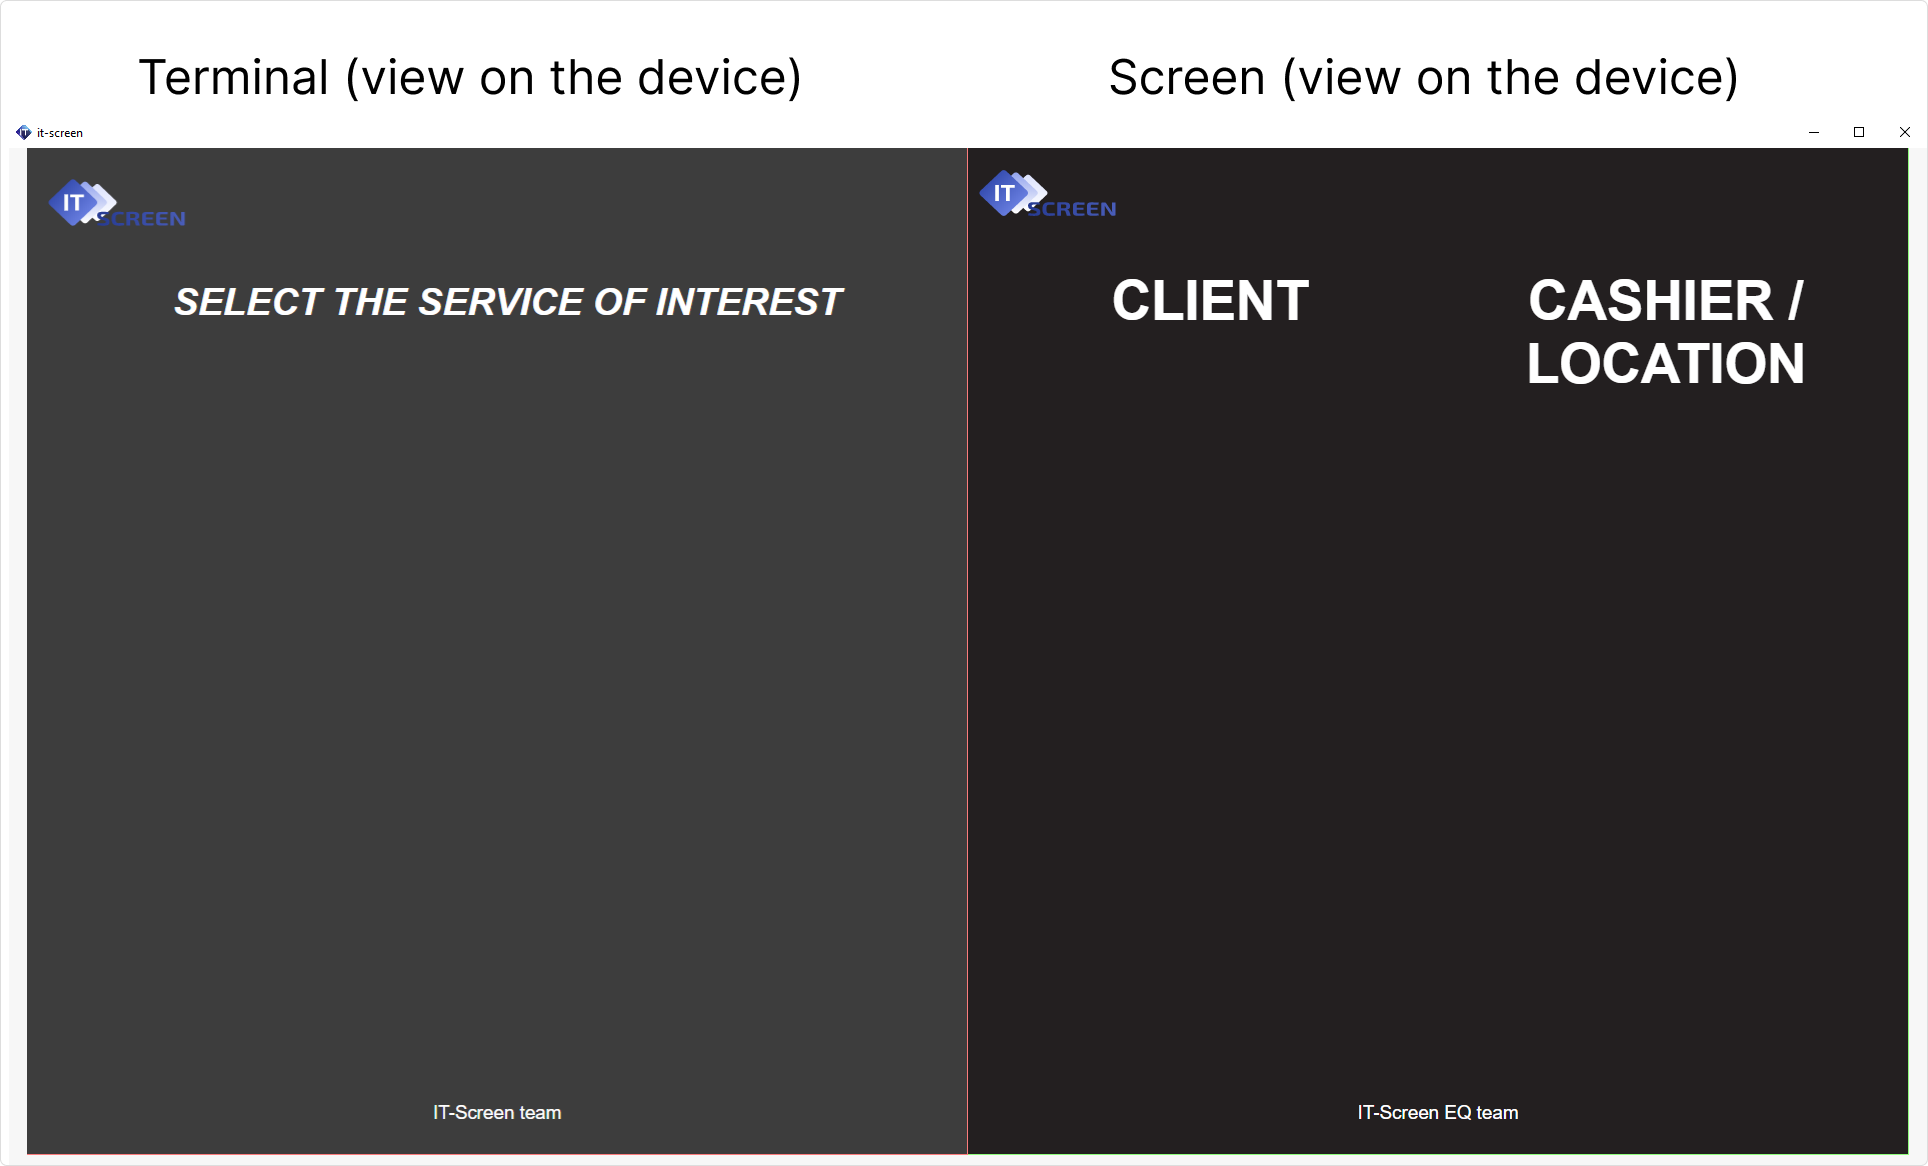
If the terminal screen is empty (no services shown), this means either no services have been created yet,
or the device settings do not specify the correct user.
3. Creating Operations and Services for the Electronic Queue
Let’s briefly revisit some key terms in the electronic queue system:
- Operation – a Library item of type Electronic Queue, tagged for linking to a service. Operations are not nested.
- Service – a Karmik of type Electronic Queue. Can include nested operations. Nesting is defined by the set of linked operations.
It is assumed that the structure of services and operations (their number, names, and nesting) has been planned by the organization and is ready for use.
As an example, this guide will define the following queue structure:
- Retail Customer Service and Corporate Customer Service are Services
- Retail Deposits, Retail Loans, Foreign Exchange, Corporate Deposits, Corporate Loans, Cash Management, and Consultation are Operations
Example Structure of Services and Operations
1. Retail Customer Service
1.1 Retail Deposits
1.2 Retail Loans
1.3 Foreign Exchange
2. Corporate Customer Service
2.1 Corporate Deposits
2.2 Corporate Loans
2.3 Cash Management
2.4 Foreign Exchange
3. Consultation
The Consultation operation will be used standalone, not nested within any service.
This is a sample structure useful for learning or testing. It covers all possible scenarios for using the electronic queue.
The flexibility of the IT-Screen platform allows organizations to configure the queue based on their actual service list and business processes.
3.1 Creating Operations
Before creating operations, it's recommended to prepare icons for each operation.
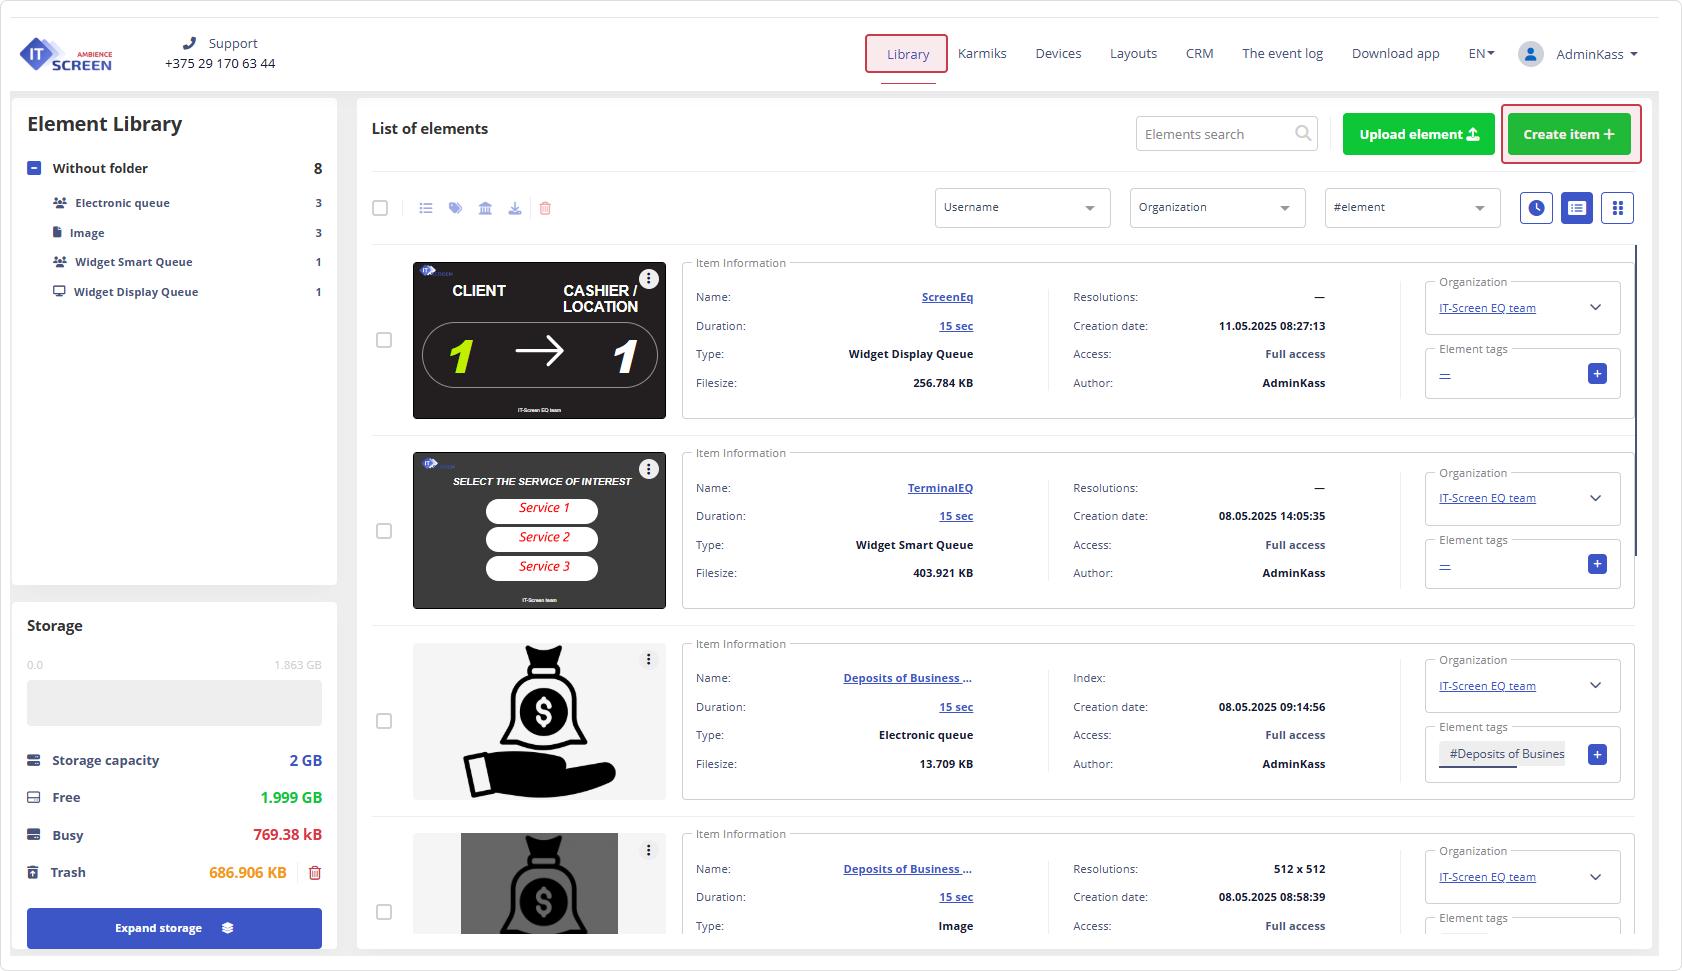
1) Go to the Library menu and click
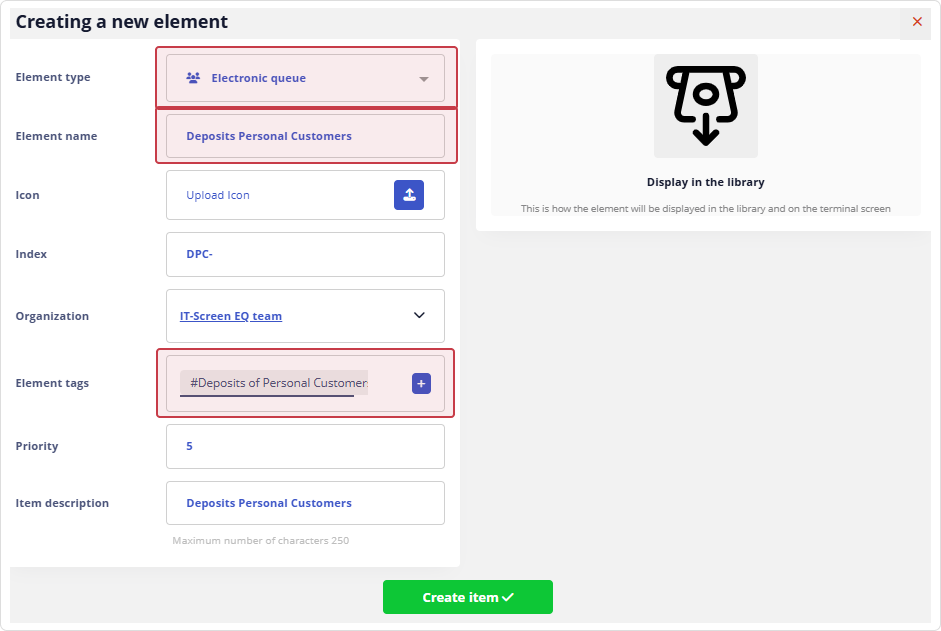
2) Select and fill in the required fields: Element Type, Element Name, and Element Tags, then click
Additional Operation Settings
The following fields are optional but recommended where applicable:
- Icon – improves visual appearance of the operation.
- Index – adds a code to the ticket number (e.g., "Ticket № RET-1").
- Priority – sets operation priority from 1 (highest) to 5 (default/lowest).
- Element Description – a regular text field.
- Organization – filled in automatically.
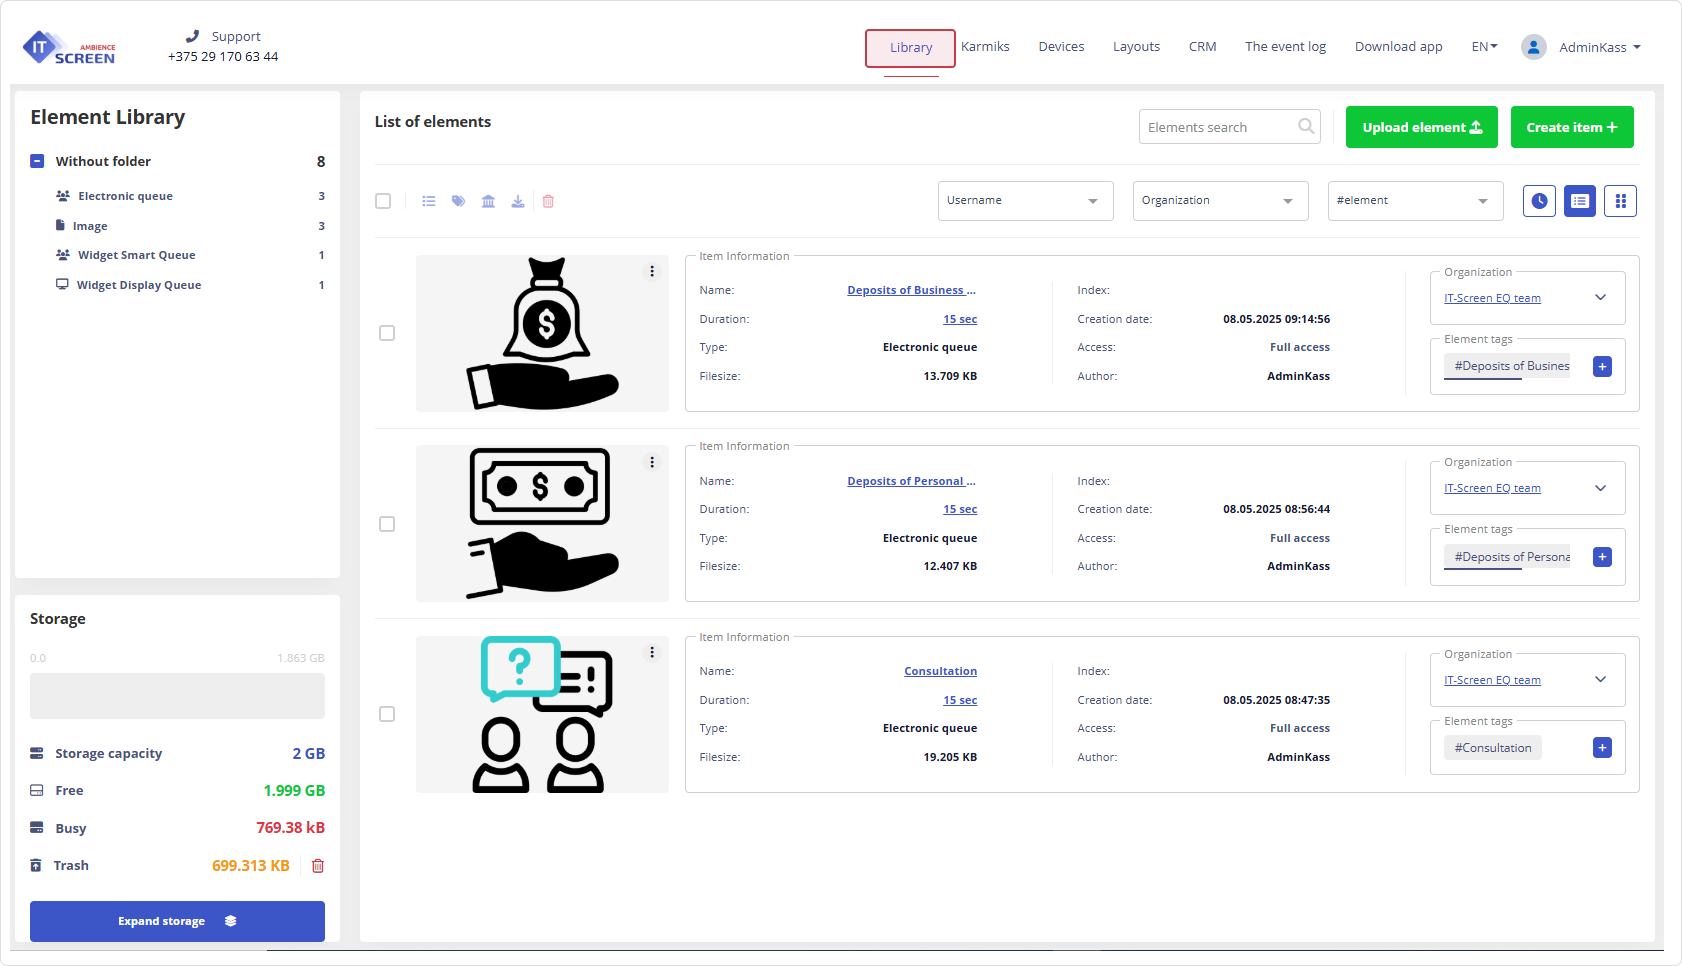
3) Repeat these steps to create the remaining operations.
3.2 Creating Services
In the Karmiks menu, sequentially create the required number of services (electronic queues).
In our example, there are two main services.
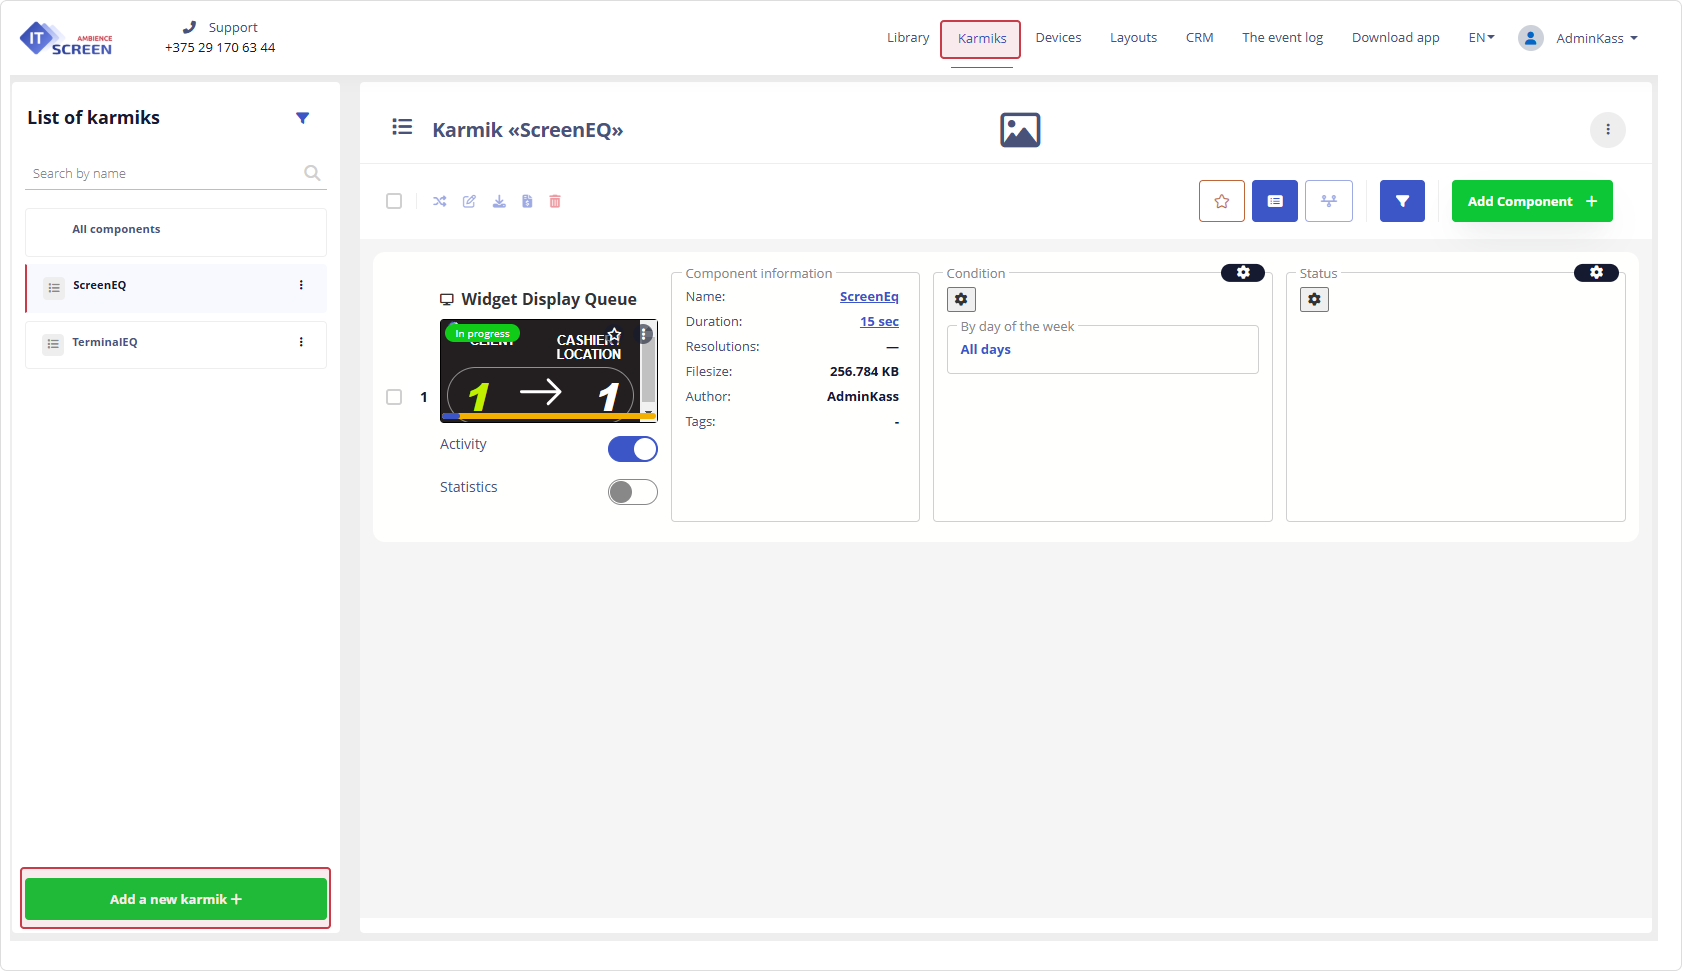
1) Go to the Karmiks menu and click
2) Enter the Karmik Name, select Display Type as Electronic Queue, and click
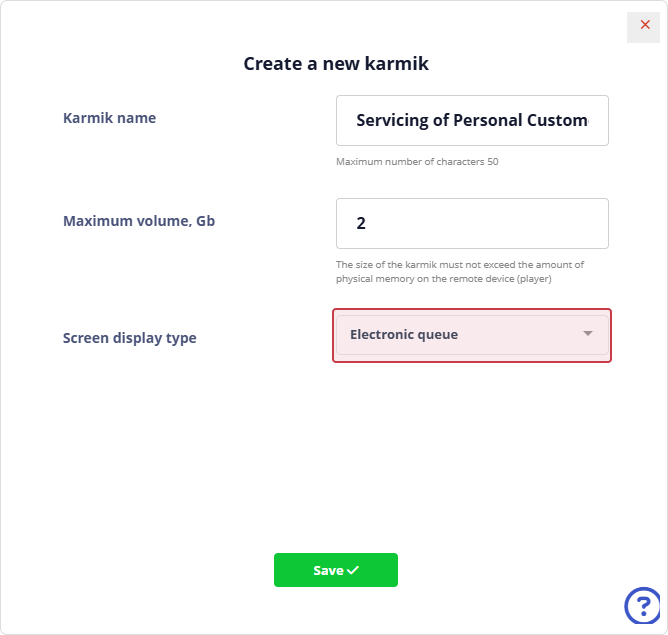
When creating an electronic queue (service), it is mandatory to select Electronic Queue as the display type in the Create New Karmik form.
If everything is done correctly, the first service button — Retail Customer Service — will appear on the Terminal screen.
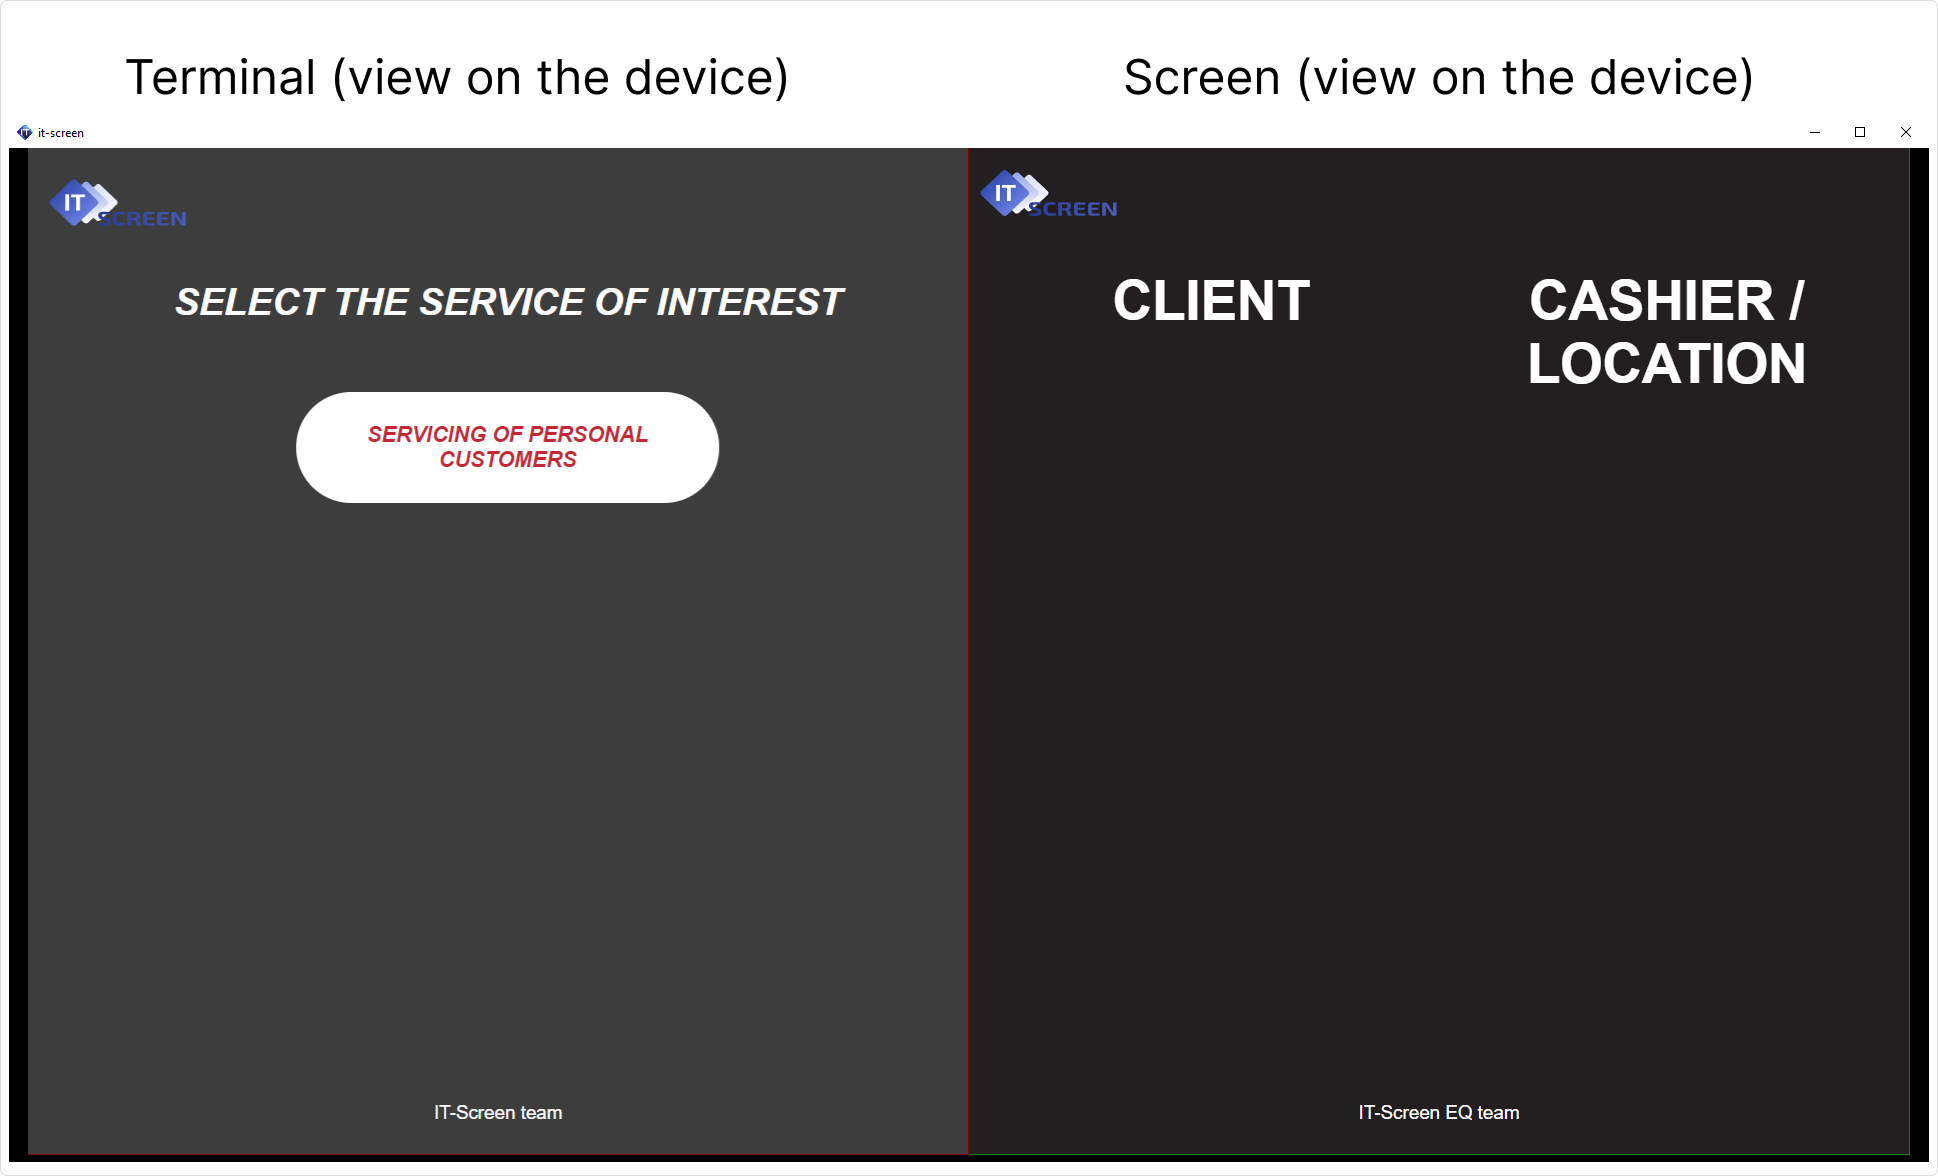
3) After successfully creating the service, assign a number or name to the operator’s workstation.
In our example: Cashier/Workplace - 1

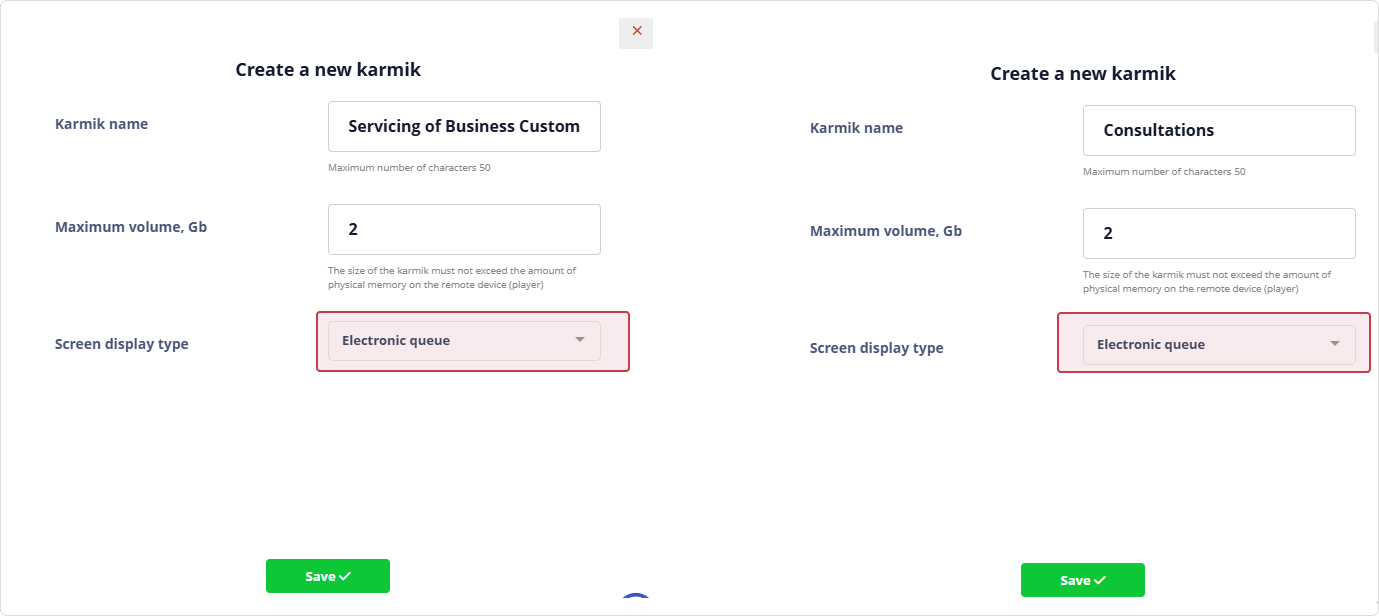
4) Similarly, create the remaining services – Servicing of Business Customers and Consultations
In our example, there is no Consultations service, only a corresponding operation.
Since an operation (as a Library item) cannot be displayed on the Terminal directly, it must be linked to a similar service.
5) Link each operation to the corresponding service (see example above)
This is done in the Karmik settings by using the element tags (operation tags).
Click the icon
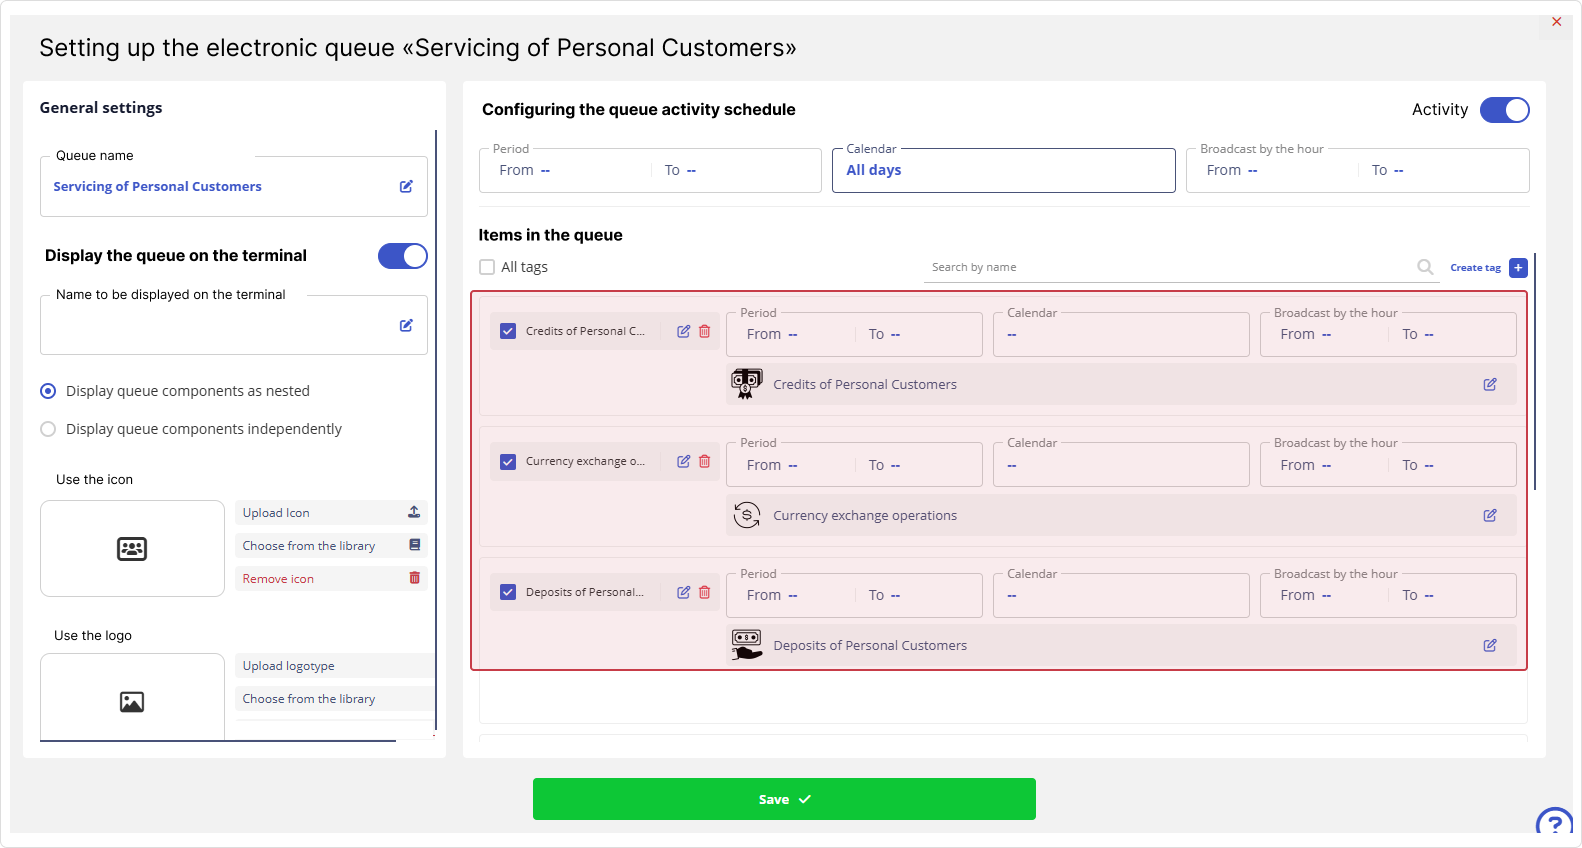
6) Click
Now the operations for Servicing of Personal Customers will appear on the Terminal screen.
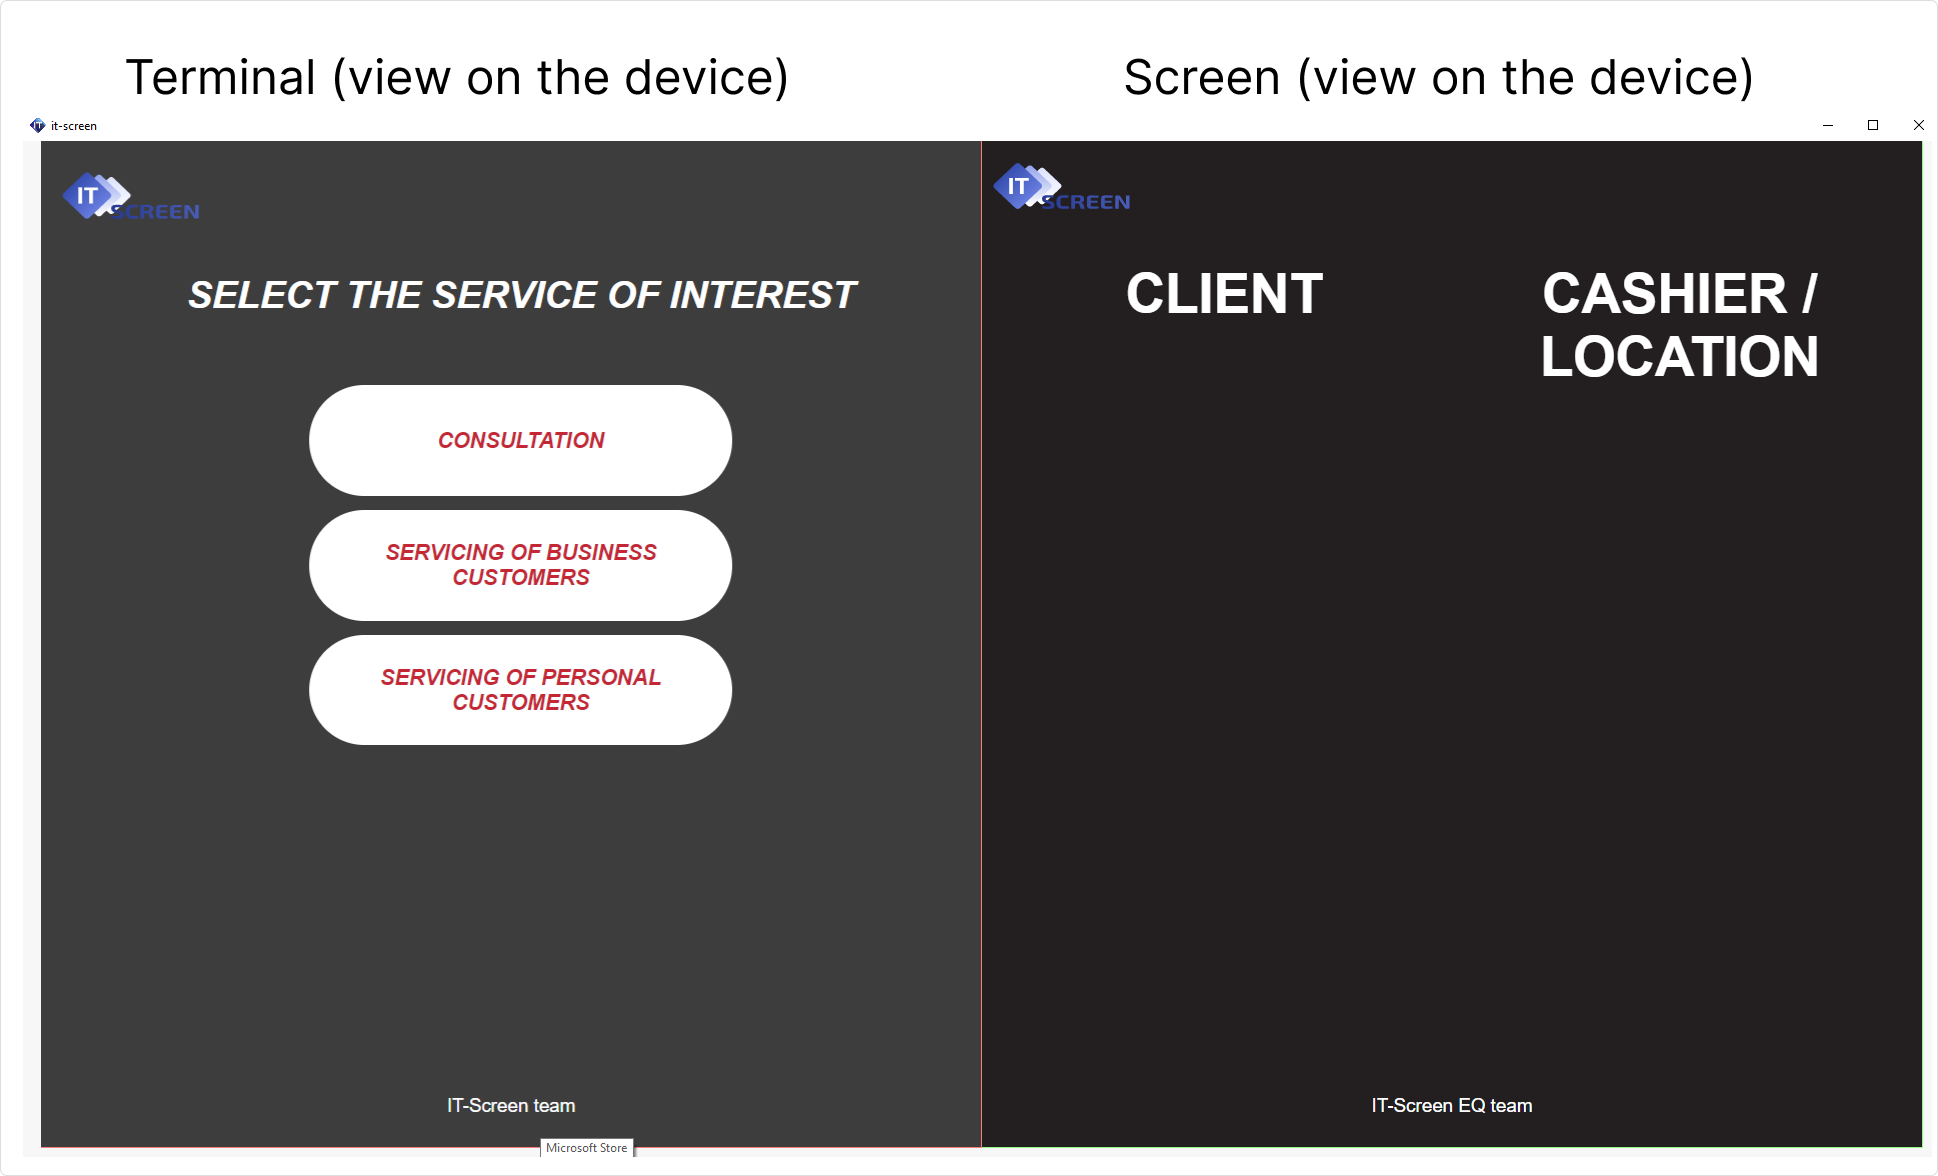
7) Similarly, link the remaining operations to their corresponding services.
The Consultation operation is designed to be used independently, without nesting in a service, so its configuration has special considerations.
8) In the Consultation Karmik settings, enable the option:
Display queue components independently
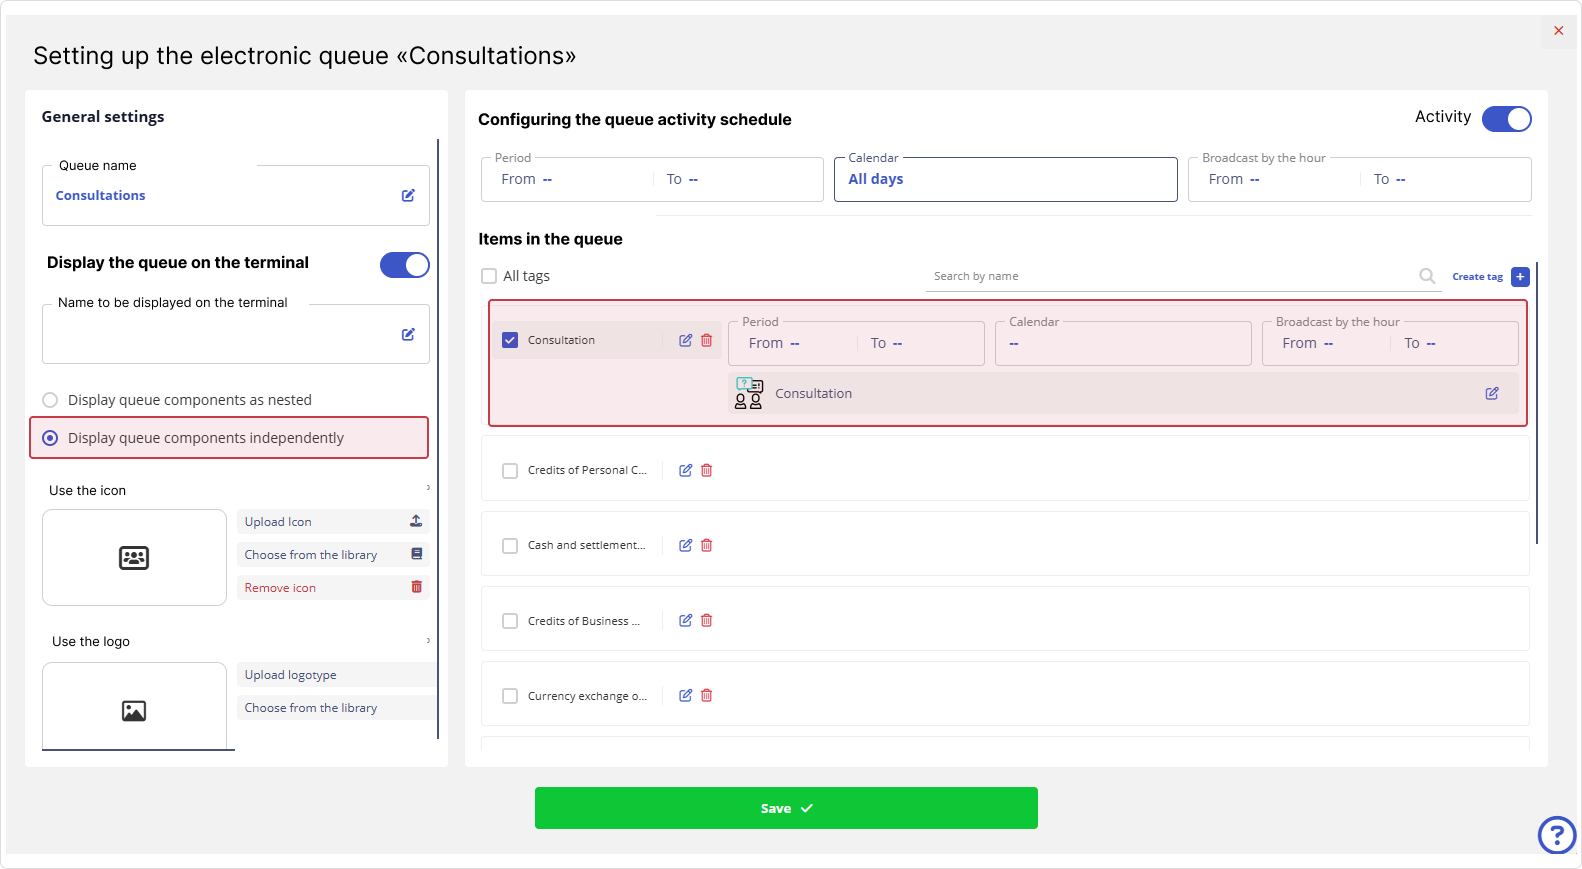
Now the Consultation operation will appear as a separate button on the Terminal screen (not nested in any service).
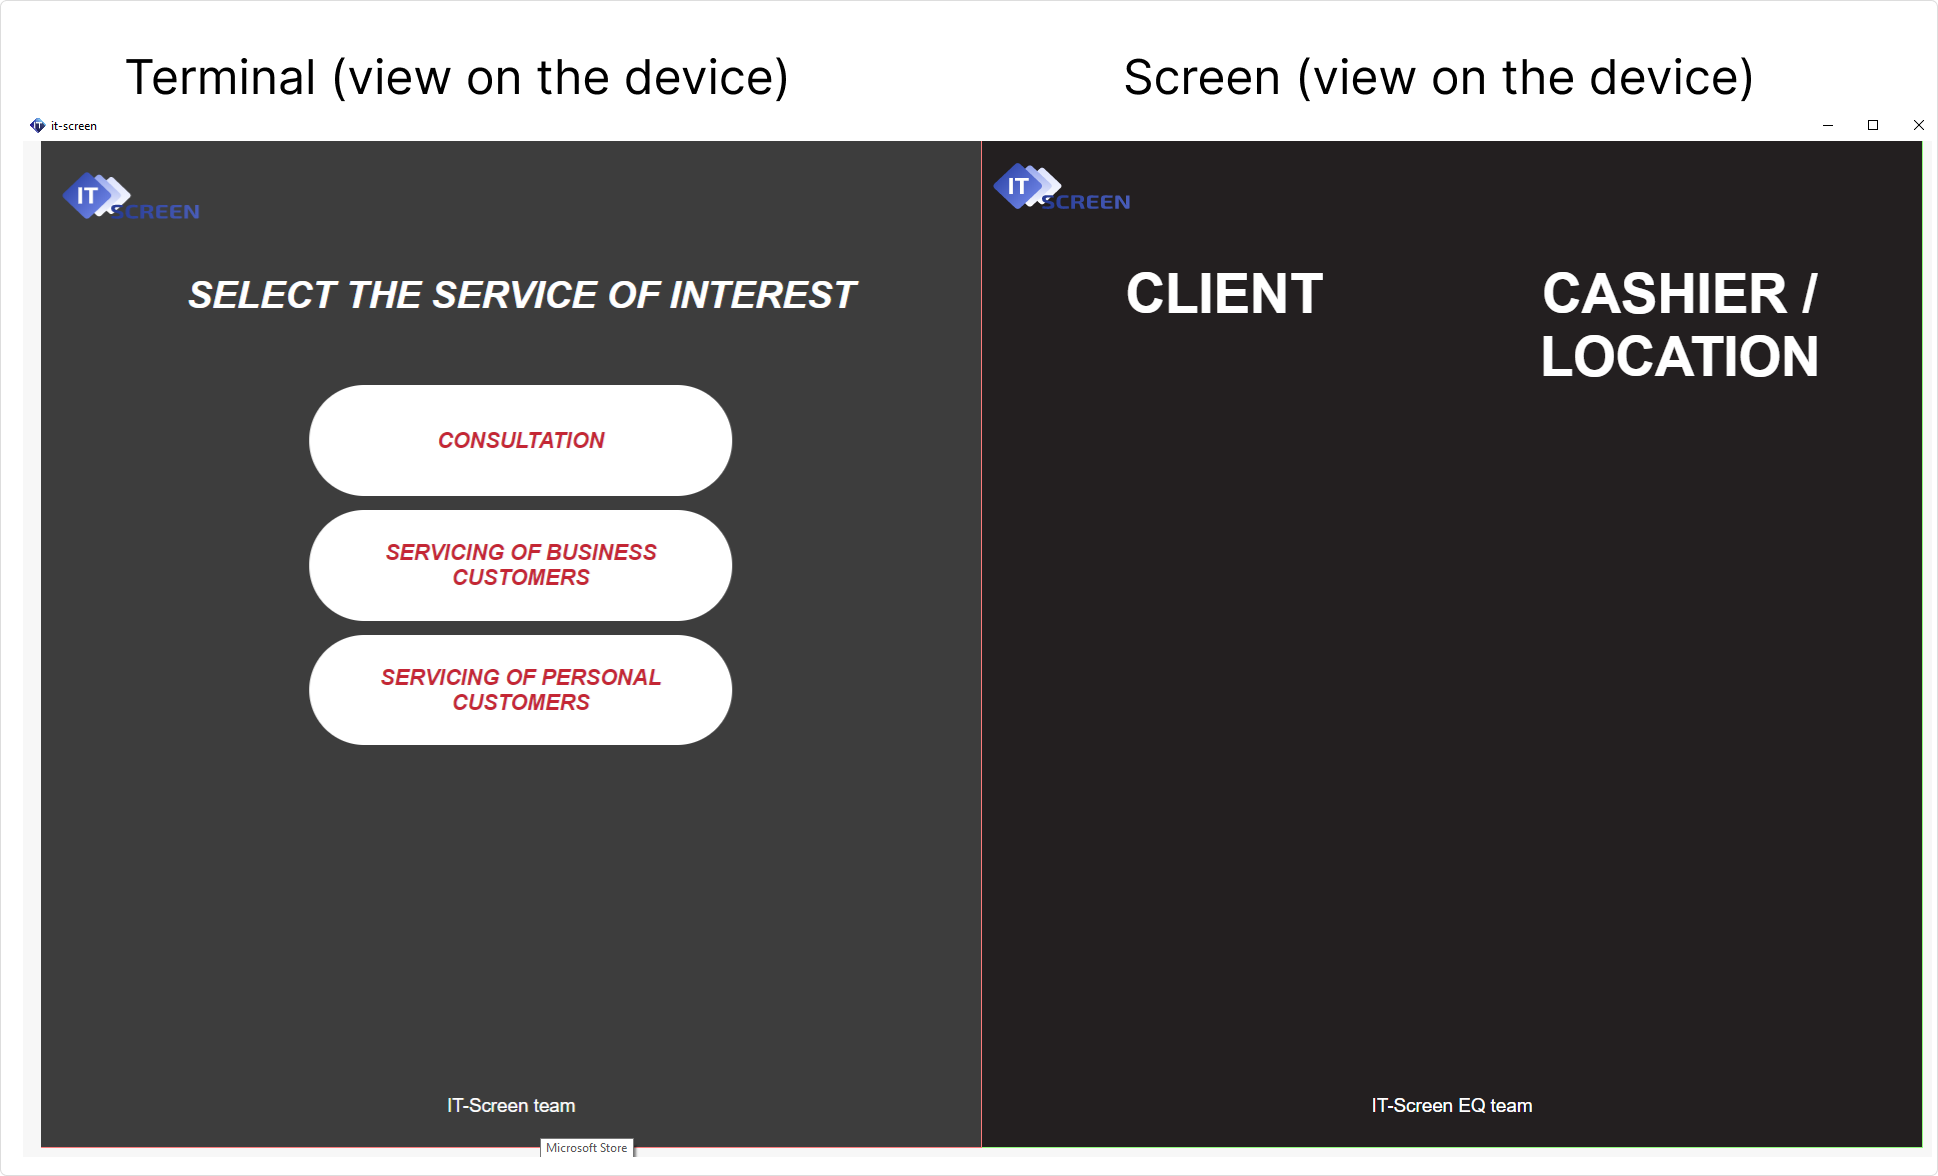
Initial electronic queue configuration is now complete.
Additional Features and Settings
1. Using Filters in the Karma List Window
In a large organization where the IT-Screen service performs functions of remote content management, IoT devices — there can be an infinite number of karmas, and navigating through such a quantity can be difficult.
To make it more convenient for users, there is a solution in the form of applying filters by user and/or karma type.
Example of Using a Filter in the Karma List Window
Example of using a filter in the Karma List window
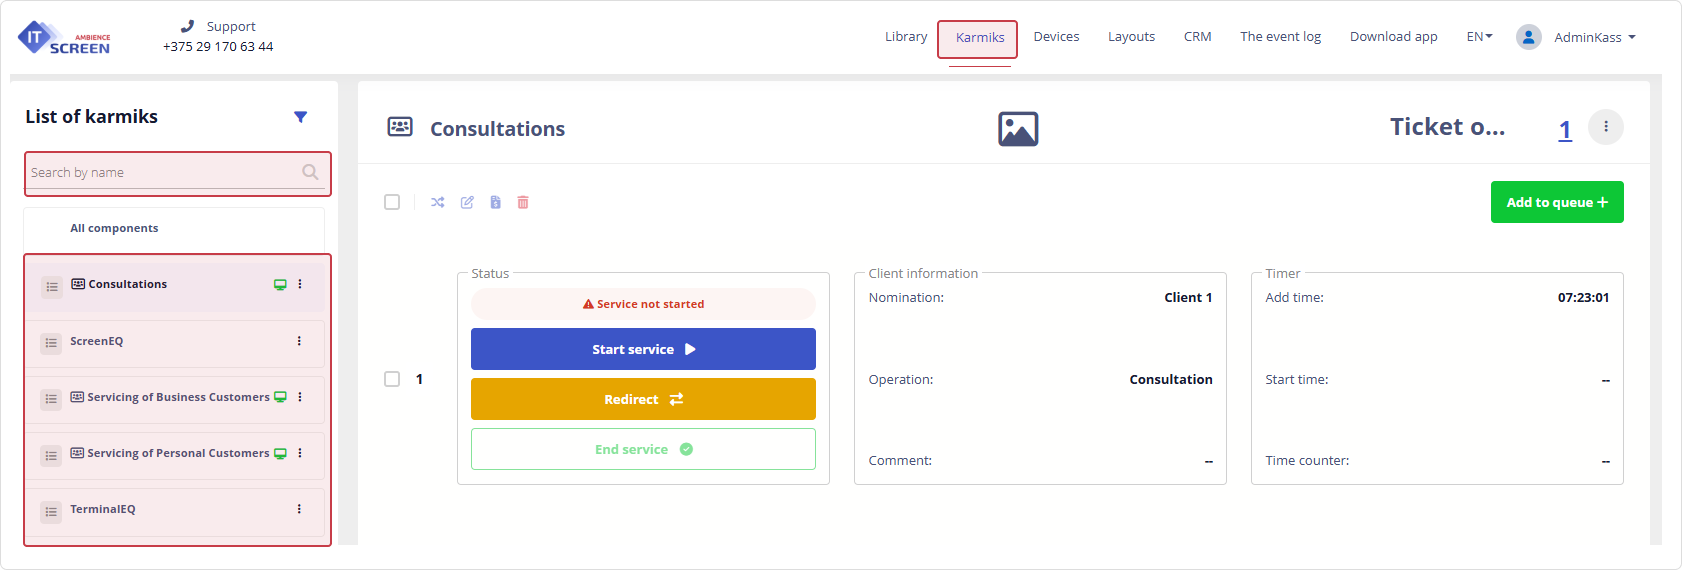
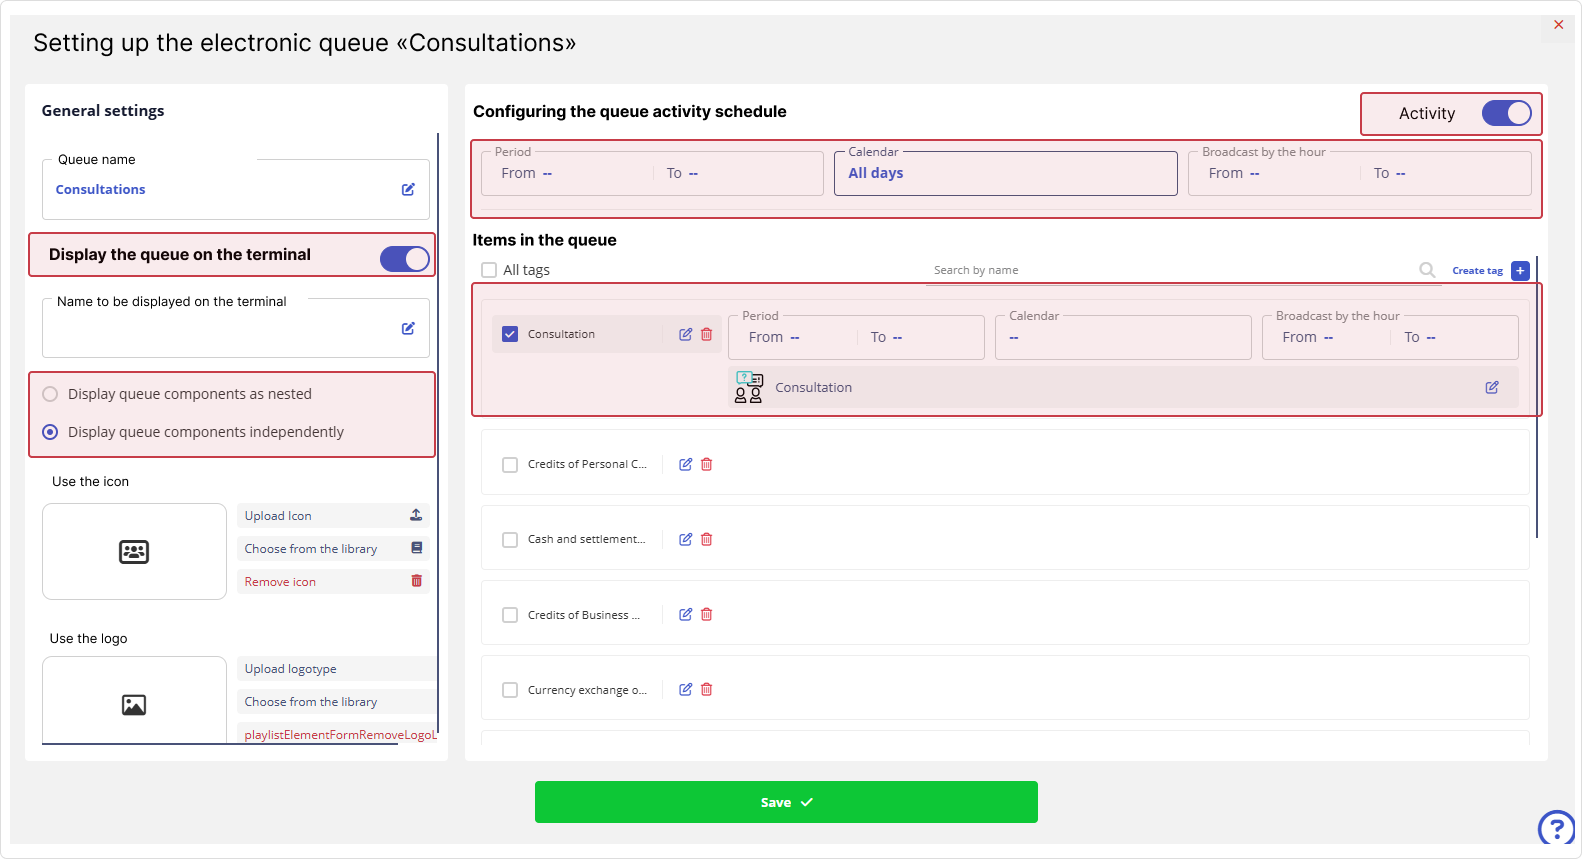
2. Additional Settings for the Electronic Queue. Setting the Queue Activity Schedule.
Additional electronic queue settings make it possible to manage services and operations in various ways, such as:
– Disabling queue activity — the service and operations in the queue are completely disabled.

– Hiding the queue on the terminal — the services in the queue will be active, but the buttons for selecting them on the terminal will not be displayed. This way, electronic queues can be transformed into visitor service points.

– Displaying multiple queues on the terminal.

– Configuring queues and operations either per service or per operation. In this case, the operation is displayed as a separate button on the terminal.

– Setting queue activity schedule based on the working hours of organization employees.

– Setting activity schedule for operations depending on the working hours of organization employees. In the example provided, Consultation is available only on weekdays from 9:15 AM to 6:30 PM; at other times the operation is hidden.

Example of Using Electronic Queue Settings
3. Users. Configuring Access for Other Operators (Employees)
Obviously, a number of the organization's employees will be engaged in servicing visitors.
Thus, each employee is registered with an account in the IT-Screen service and granted access to the necessary electronic queue services.
Example of Organizing Access to Electronic Queues for Employees

- Employee 1 (User01) – has full access to all services and operations
- Employee 2 (User02) – has access only to operations for servicing individuals
- Employee 3 (User03) – has access only to operations for servicing legal entities
Example of Organizing Employee Access in the IT-Screen Service Interface

- Employee 1 (User01) – has full access to all services and operations
- Employee 2 (User02) – has access only to operations for servicing individuals
- Employee 3 (User03) – has access only to operations for servicing legal entities
Access to statistics is described here
4. Ticket Numbering Algorithm
- A unique sequential numbering is used within one parent organization. If the company has several geographically distributed branches, then by using each branch’s name as the organization, a separate ticket numbering will be established for each branch.
- When using an Index in the operation settings, a unique sequential numbering will be used within the organization and the index (usually the first letter of the operation name).
- If some operations use letter indexes and some do not, the part without letter indexes will share a single numeric sequence.
- If a group of operations shares the same letter index, they will also share the same sequential numbering.
- Indexes are configured when setting up operations in the Library.
5. Using the Dashboard
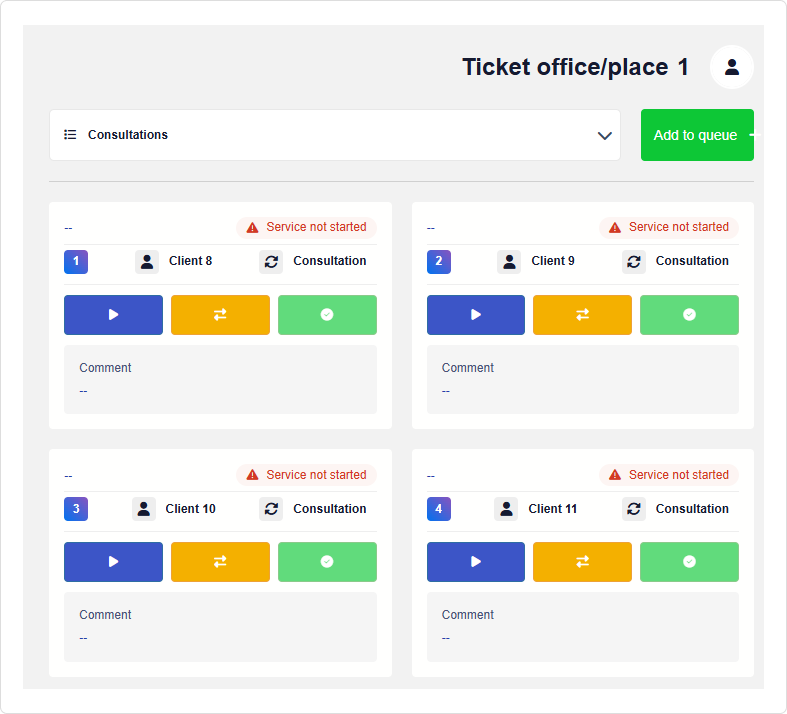
Using Dashboards allows the interface to be significantly simplified for the end user. If an employee services only one electronic queue (or a small number of them), or uses a smartphone to serve visitors, they can be provided with an optimally configured interface in the form of a Dashboard link.
The Dashboard link is generated here:

The Dashboard link is generated in the karma settings menu and provided to the employee responsible for servicing the electronic queue, depending on their level of access.
Example of Using a Dashboard
6. Setting Operation Priorities
The service order for visitors is usually based on the time of ticket issuance, but depending on the importance of each operation, a priority can be set from 1 – highest to 5 – lowest.
Priorities are configured when setting up operations in the Library.
Example of Using Priorities
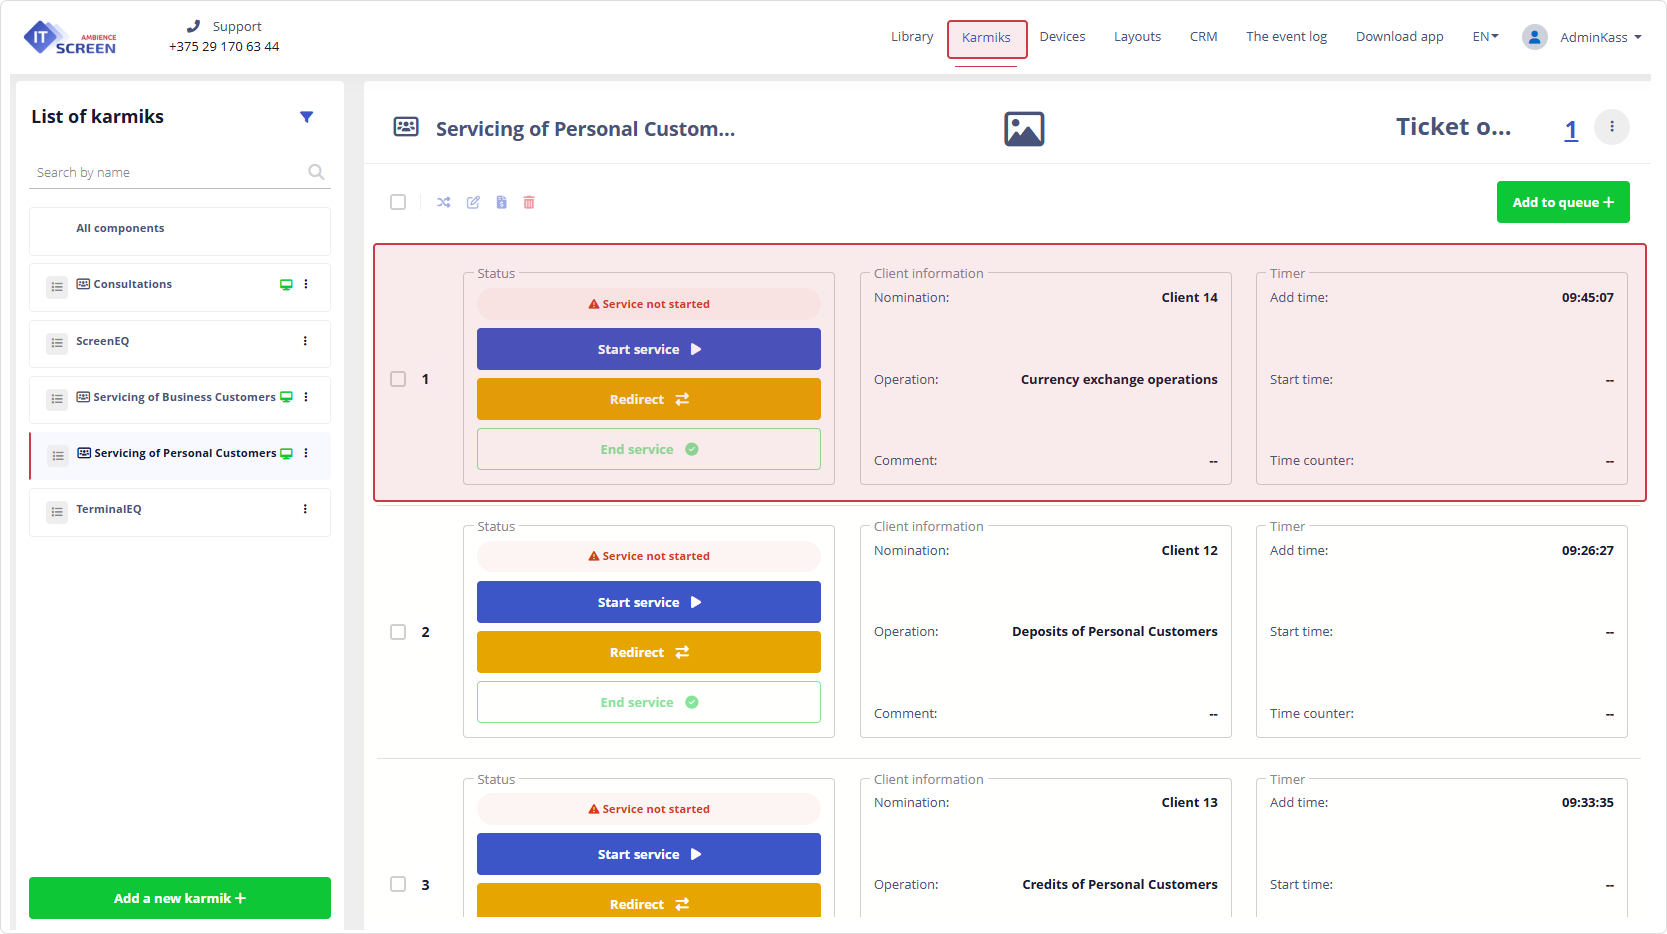
The Currency Exchange Operations service appears first in line, even though the visitor took a ticket later than others.
7. Remote Media Content Management
Using the IT-Screen service capabilities, it is possible to run the remote media content management feature in parallel with the electronic queue.
For example, the screen showing the current queue status can additionally display currency exchange rates (or any other content – ads, weather forecasts, news feeds, etc.)

Simple Example of Electronic Queue Operation
1) A visitor (client) approaches the Terminal desk, reviews the available services, and selects the desired operation. A corresponding ticket is displayed on the screen and printed for the client.
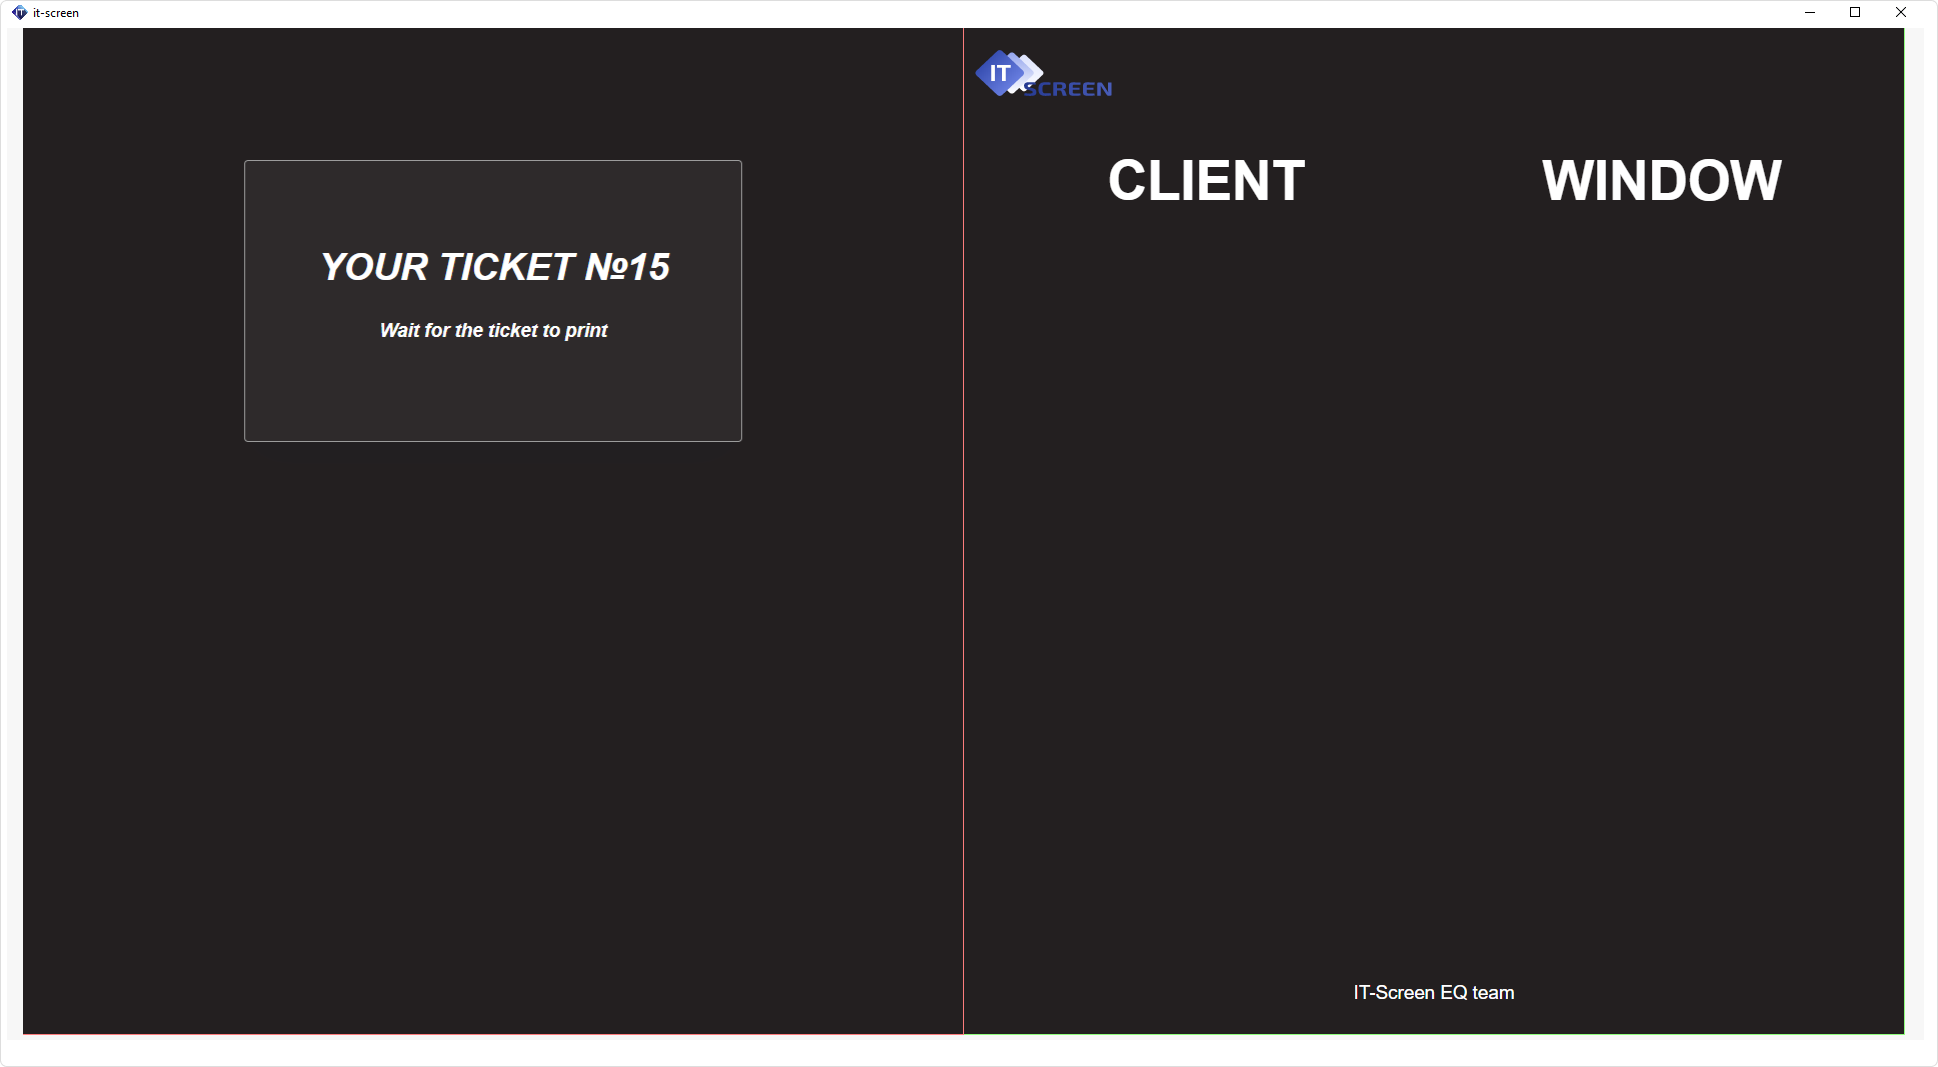
2) At the same time, the operator (employee) servicing the queue receives a sound and text notification.
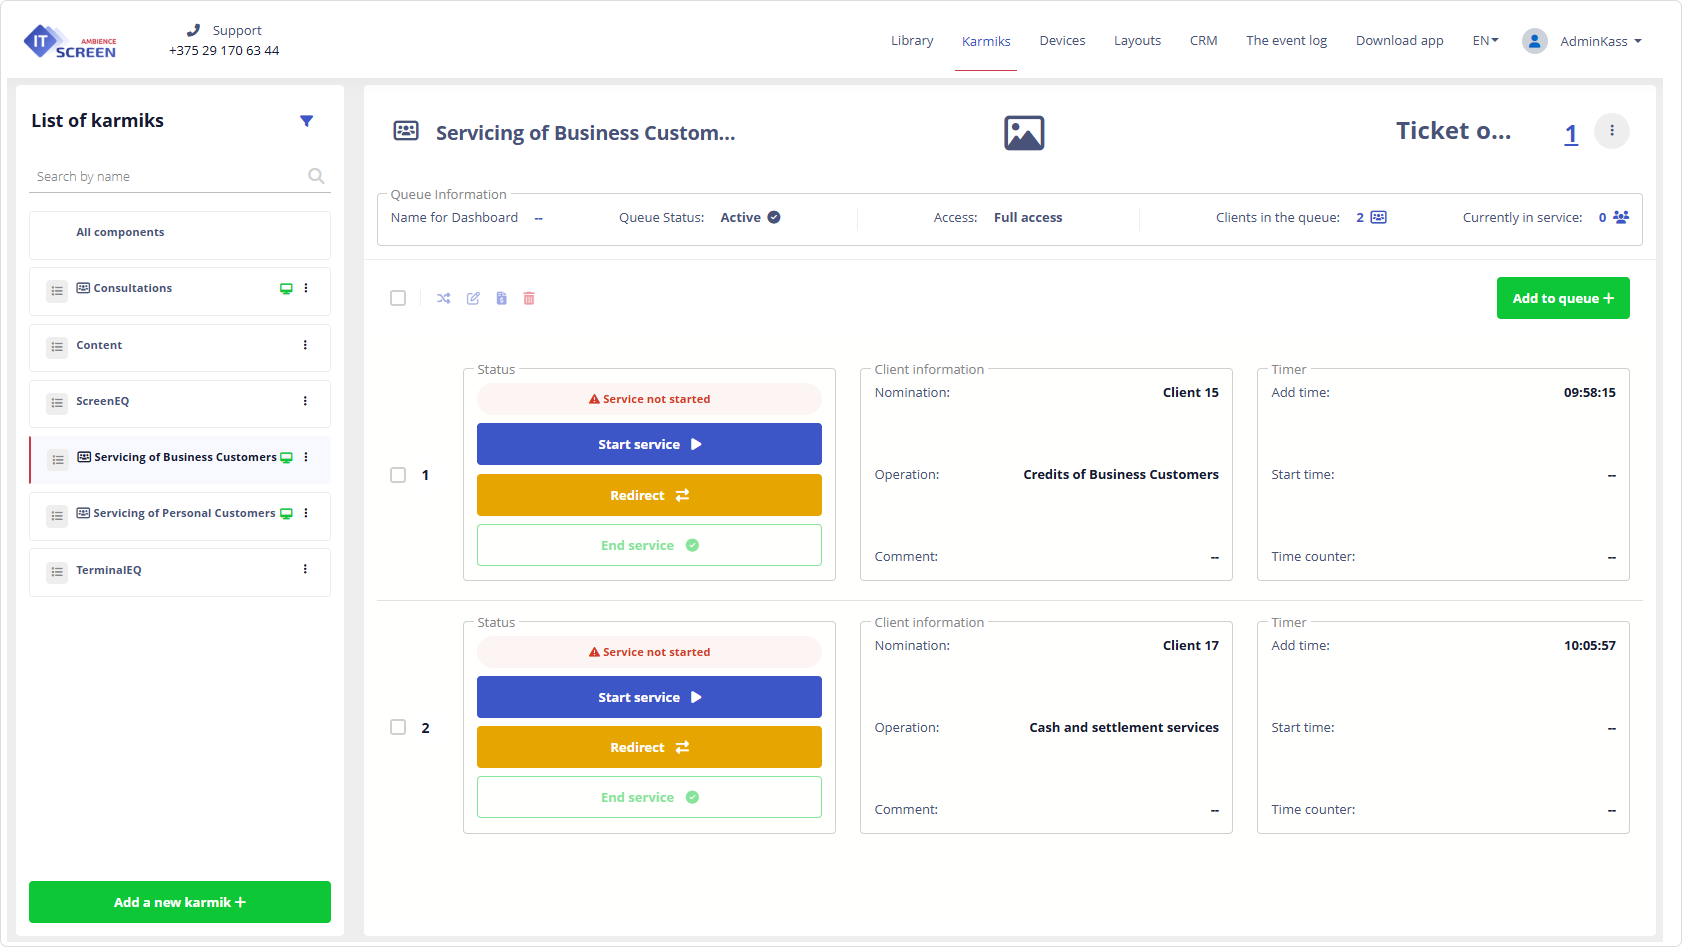
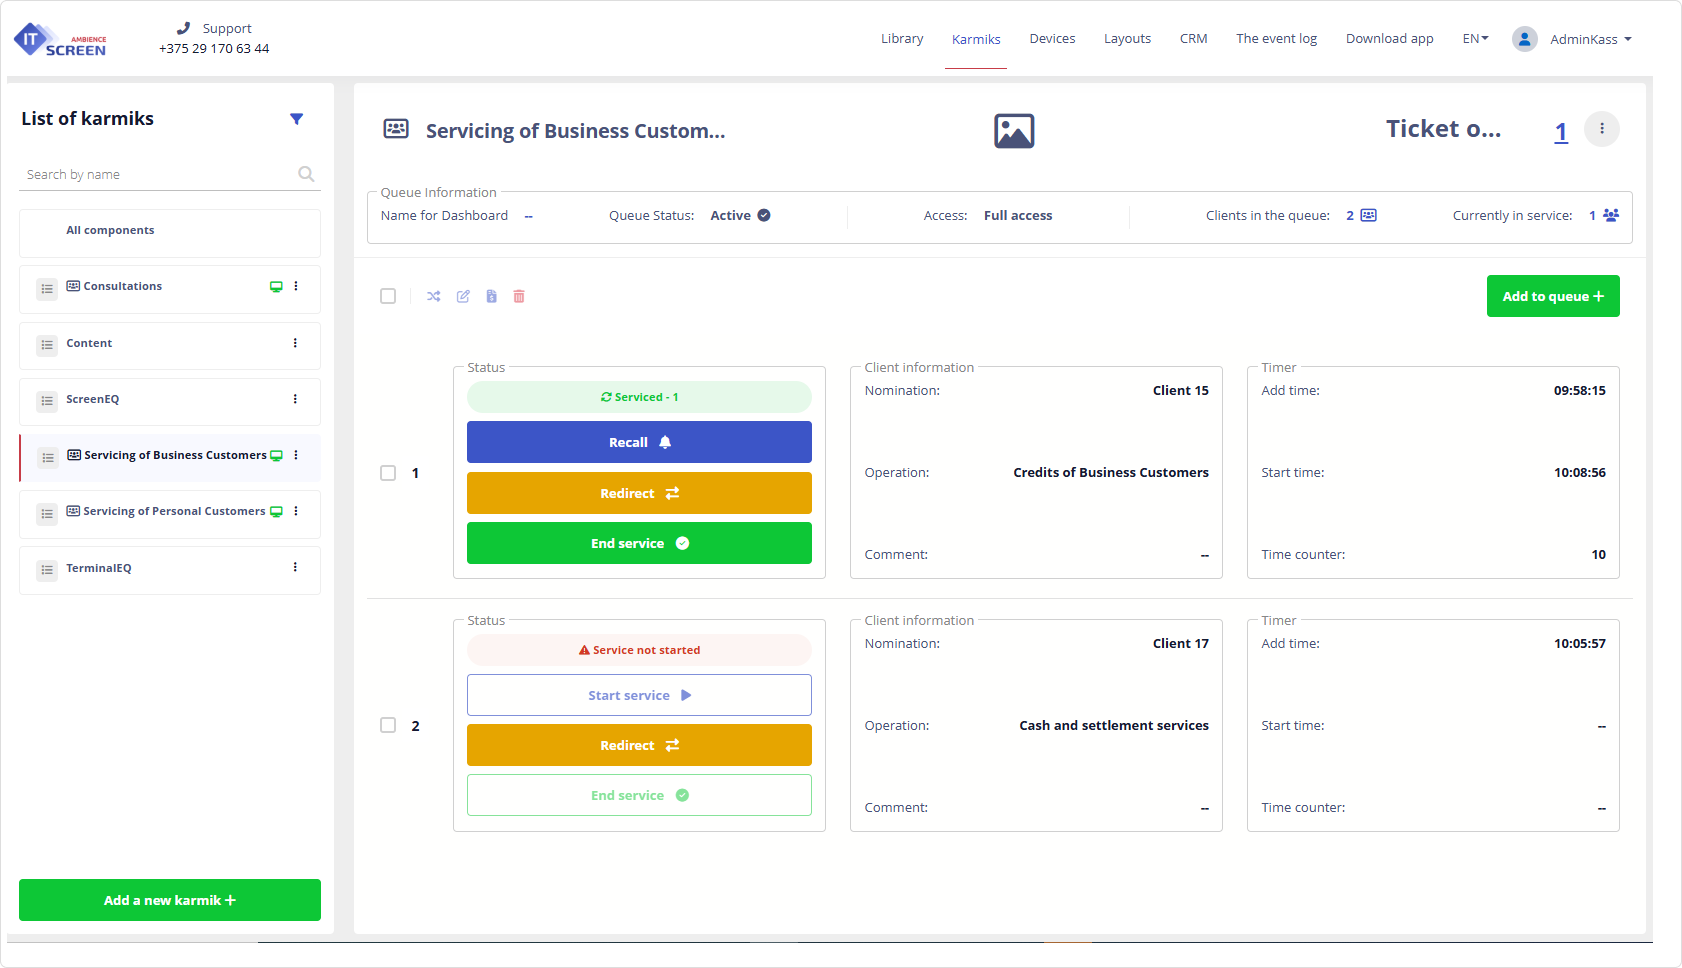
3) The employee makes a decision: either starts servicing the client or redirects them to another employee.
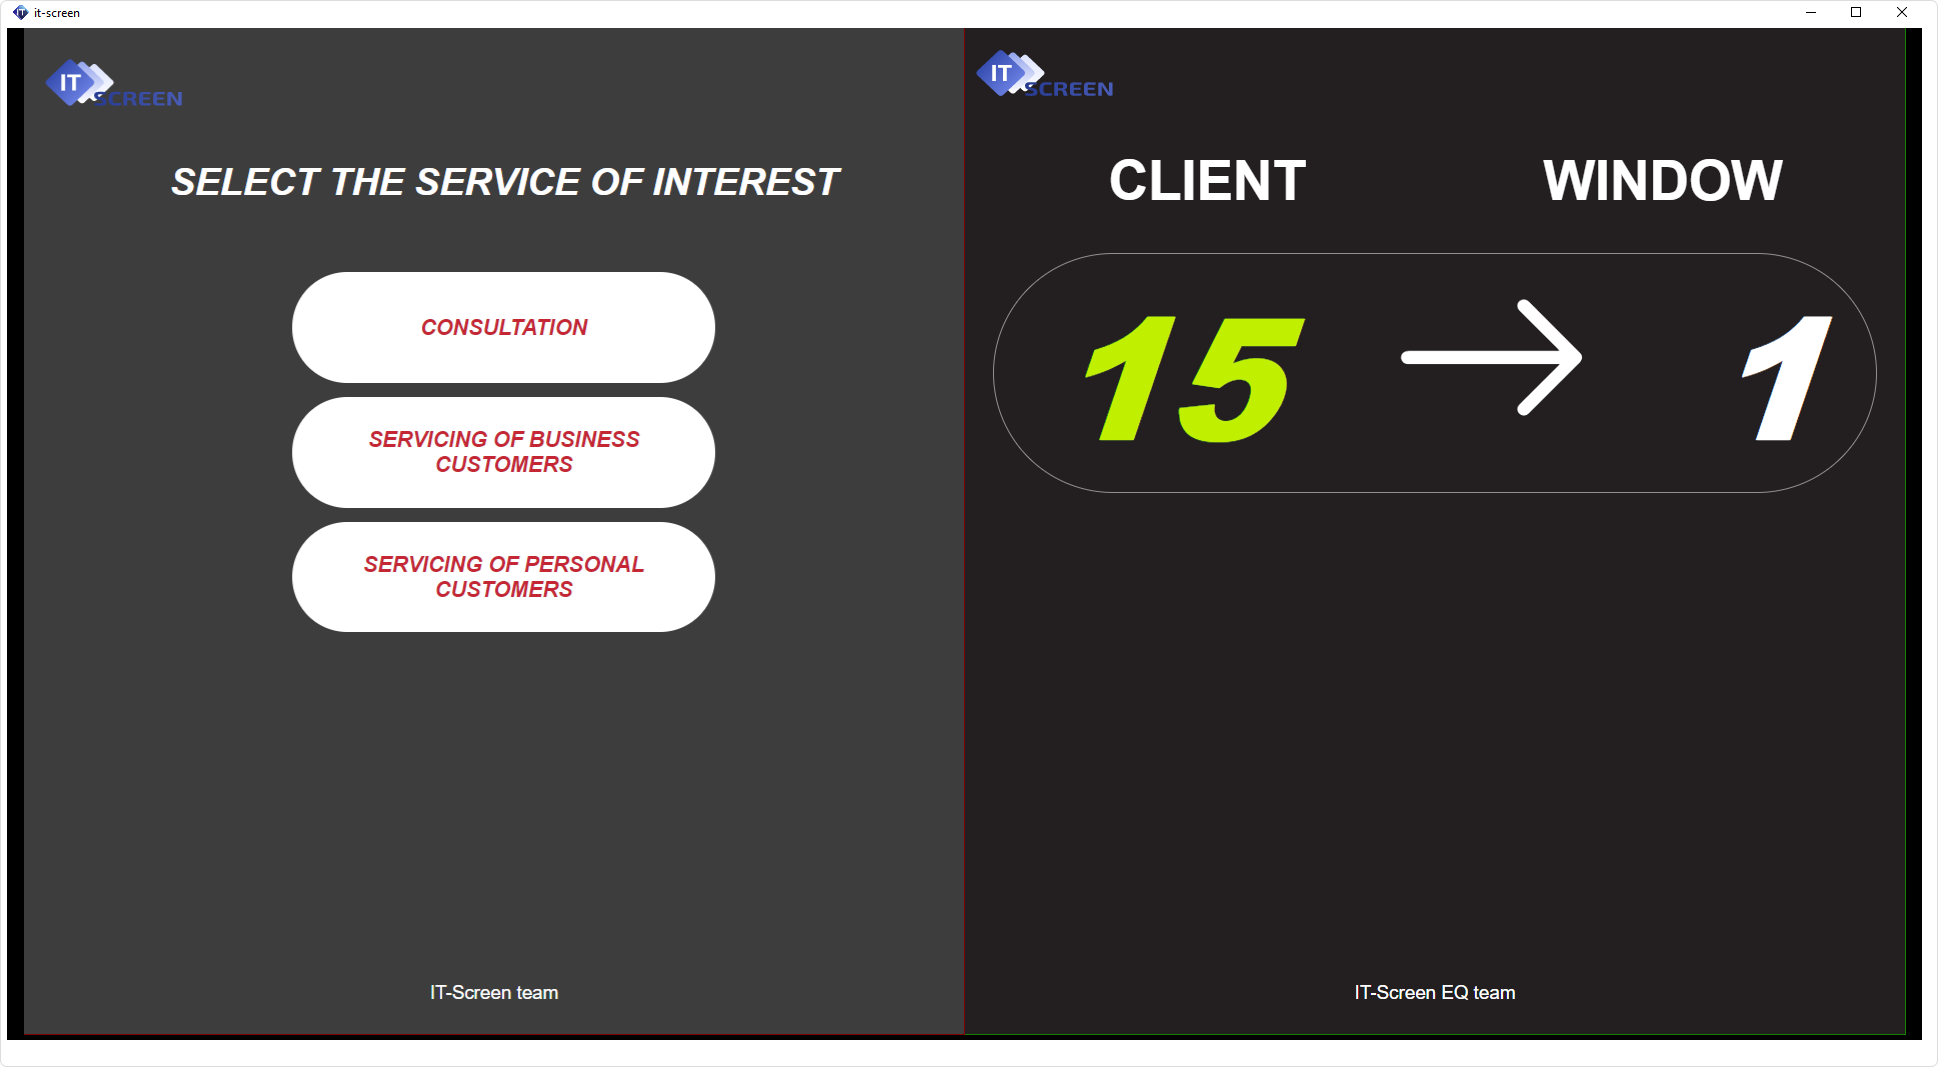
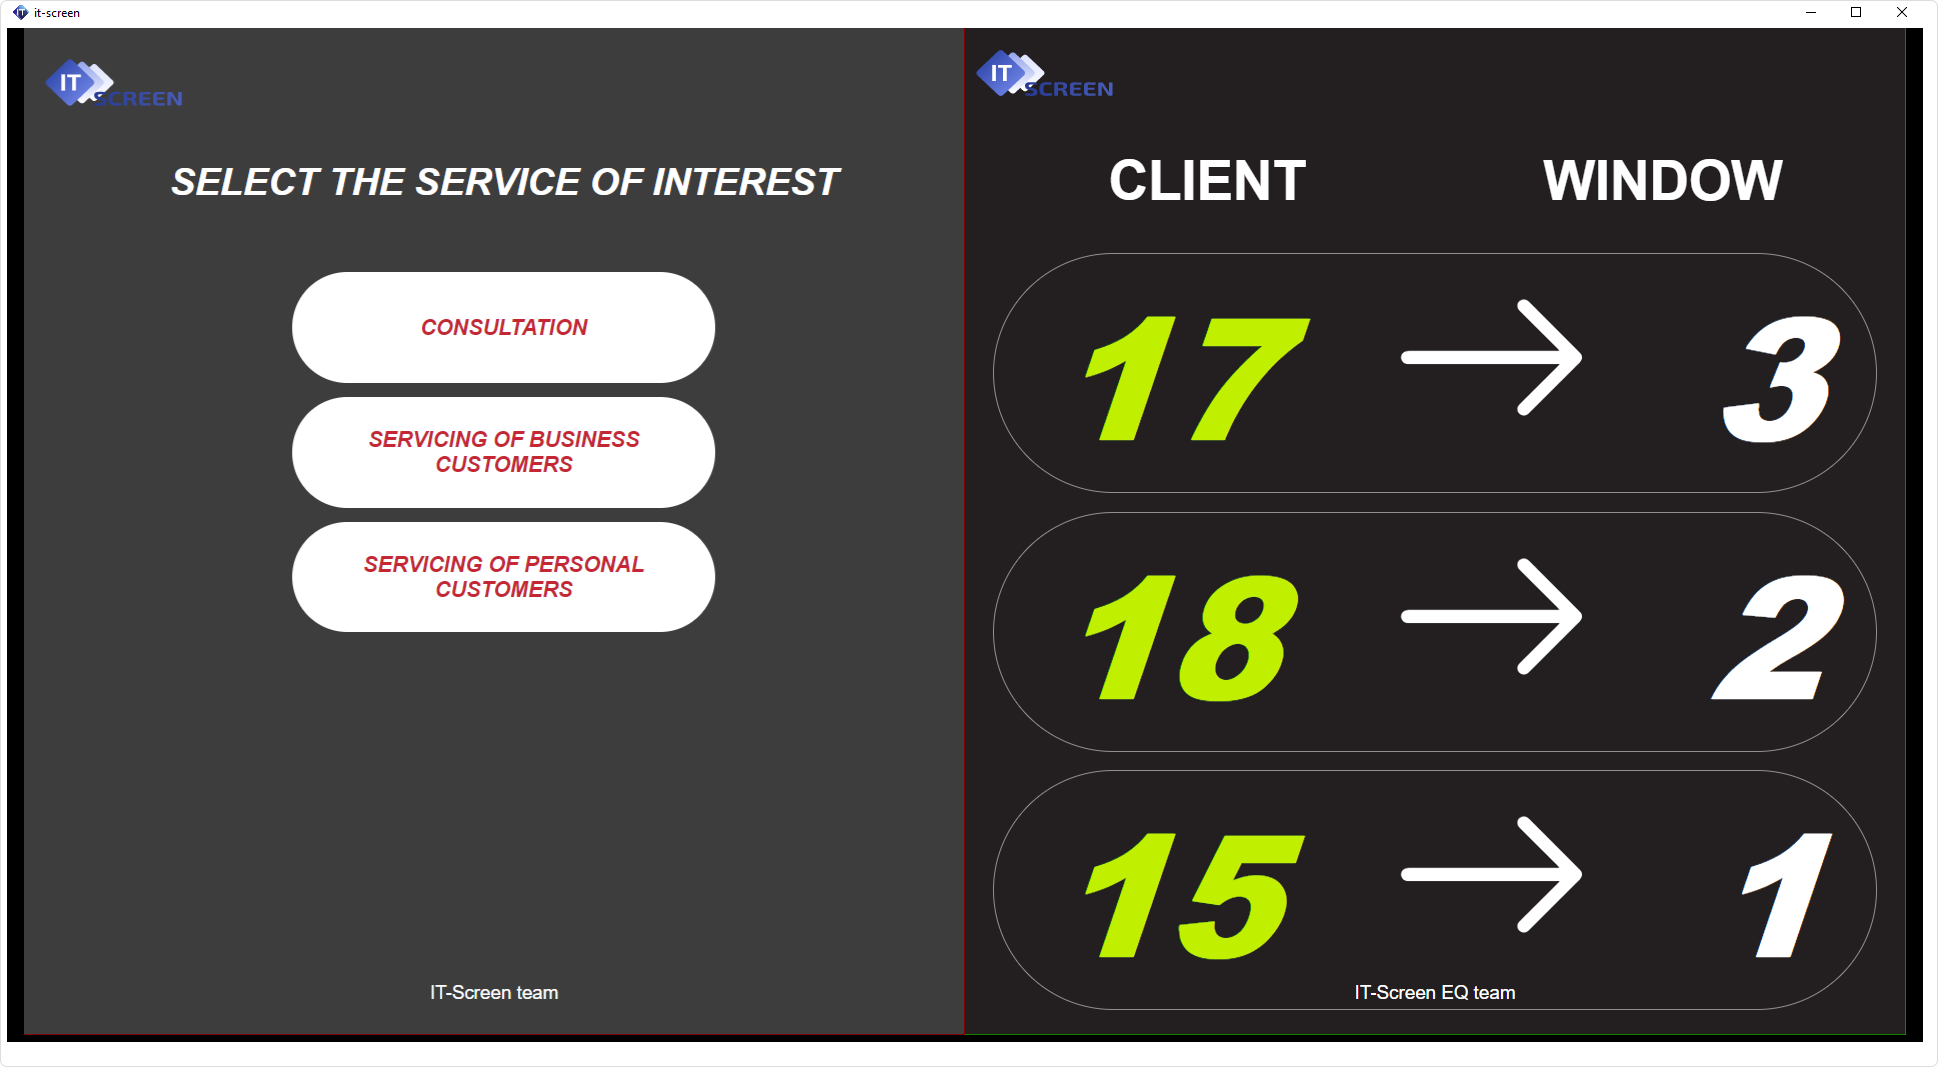
4) The information display screen shows an invitation and announces it vocally to the client – indicating which client (by printed ticket number) should approach which employee's workstation.
5) The system works across all services and operations, with servicing at all workstations.
Statistics
Statistics play a key role in optimizing operations and improving the quality of customer service.
They help to:
1. Analyze system load: identify peak and low-demand periods.
2. Evaluate employee performance: track processing time and number of serviced clients.
3. Optimize resources: properly allocate staff based on workload.
4. Improve user experience: identify problem areas such as long wait times or frequent failures.
5. Forecast demand: prepare for expected changes such as seasonal fluctuations.
Accessing electronic queue statistics is based on the following concept — the operator or an authorized company employee must have access to the electronic queue services.
Statistics are maintained for each service, broken down by operations and employees.
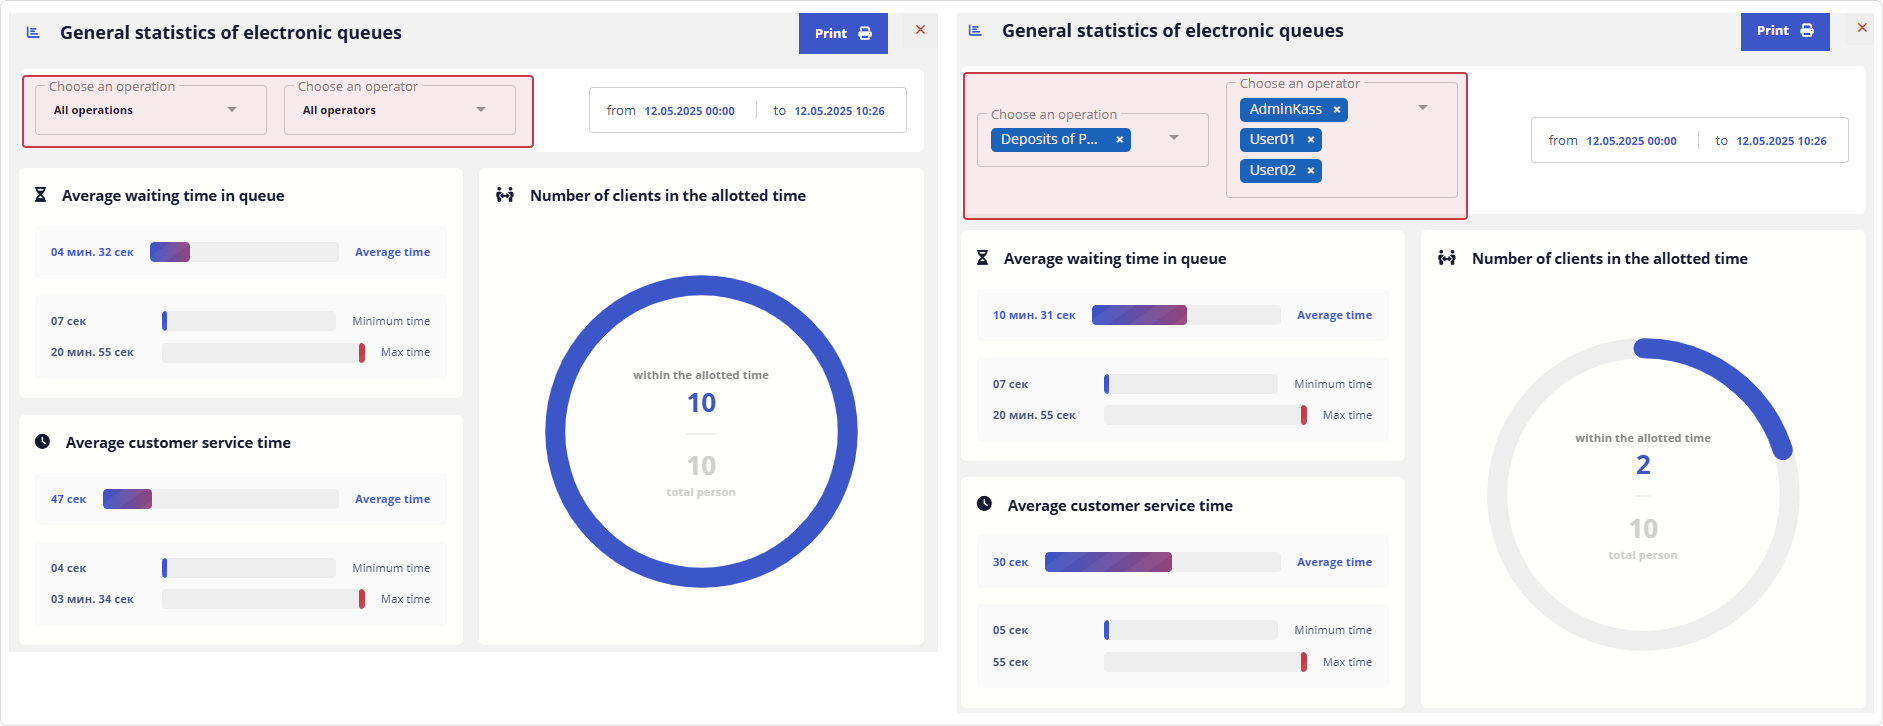
If needed, information can be exported to print or file.
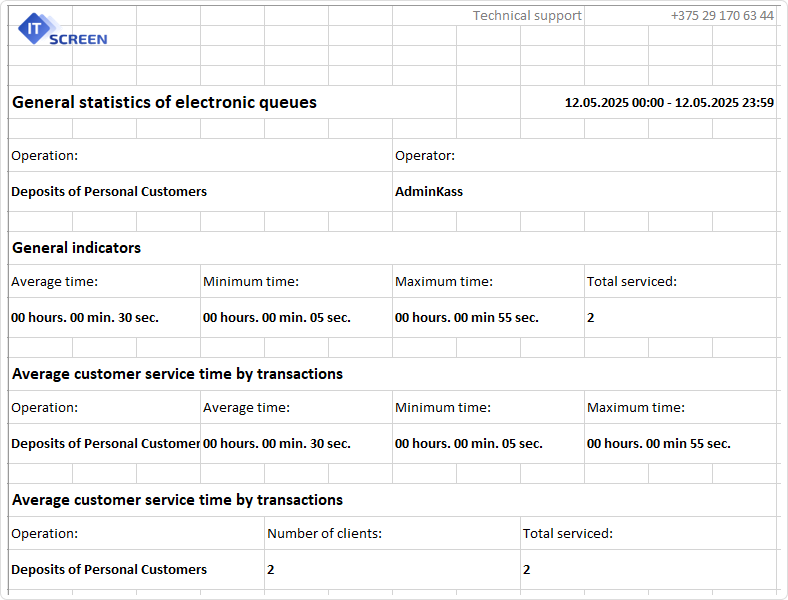
Organizing Access to Statistics
Statistics are available to queue operators for services and operations they have access to.
If it is necessary to provide access to statistics to an authorized employee who does not directly work with the electronic queue,
you must enable the slider in the karmic access settings.
1) In the Karmics menu, select the service for which you want to grant statistics access by operations.

2) In the karmic settings menu choose Access Settings.
3) In the access settings for the corresponding user who should have access to statistics, enable the View User Statistics slider.

With these settings, the AdminKass user will be able to generate statistics for all operations under the Safe Deposit Boxes service
without the ability to perform any actions related to servicing clients in the electronic queue (statistics only).
The Event Log
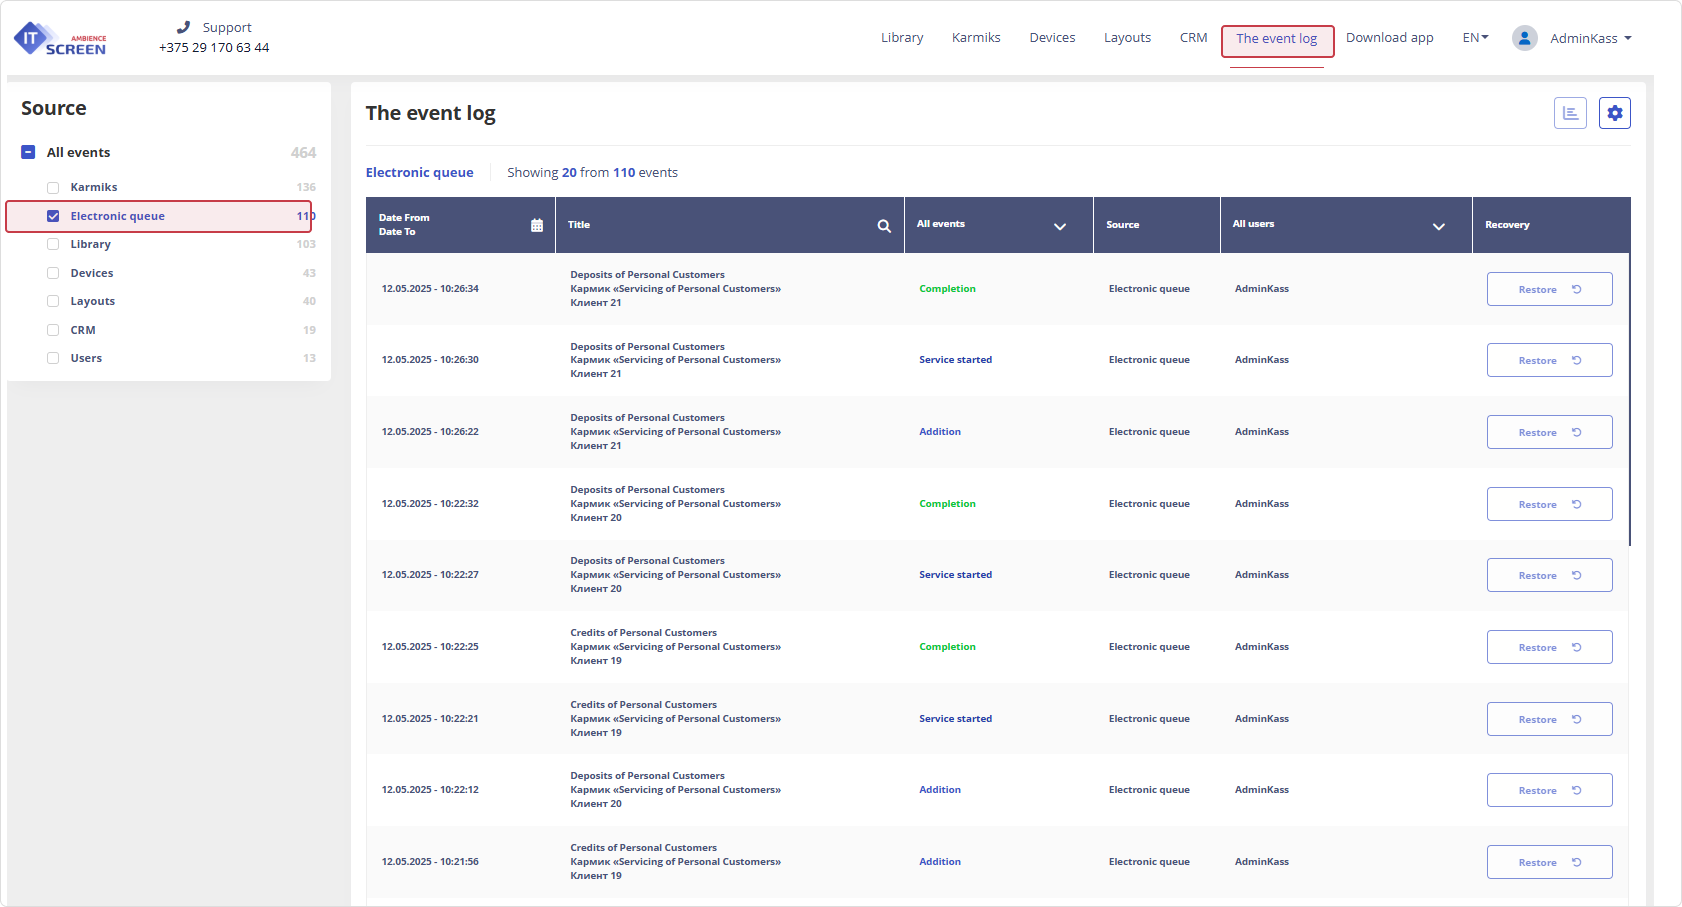
In the Event Log menu, under Source – Electronic Queue, all client ticket operations are recorded with timestamps:
- Addition – Client receives a ticket at the terminal
- Service started – Queue operator starts servicing the client
- Completion – Operator completes client service
- Recall - The operator called the customer again.
- Redirection – The customer is redirected by the operator to another queue.
Printer Setup and Client Ticket Printing (for Technical Specialists)
1. The printer must be physically connected to the system (connection type does not matter: USB, Ethernet, WiFi). Printer drivers must be installed and the printer should function properly.
2. The It-Screen_MQTT_Print application must be installed and running. Add It-Screen_MQTT_Print to system startup. The app must run in the background.
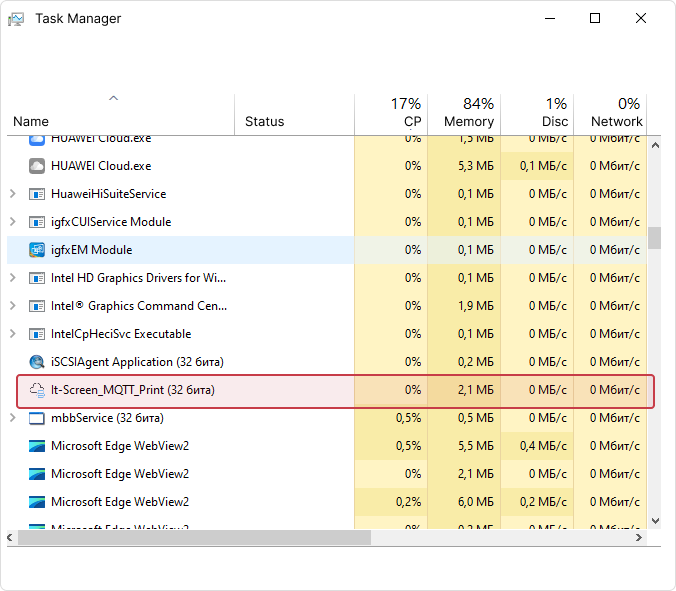
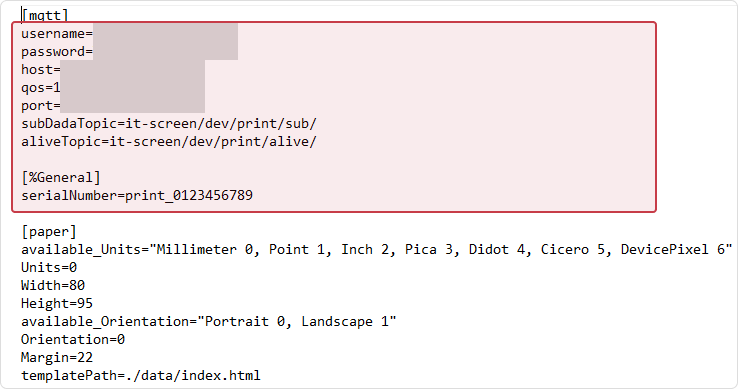
3. In the settings.conf file (in the It-Screen_MQTT_Print installation directory), specify the IP and port of the server hosting the electronic queue and MQTT, along with the printer ID.
If there are multiple printers, each must have a unique ID.
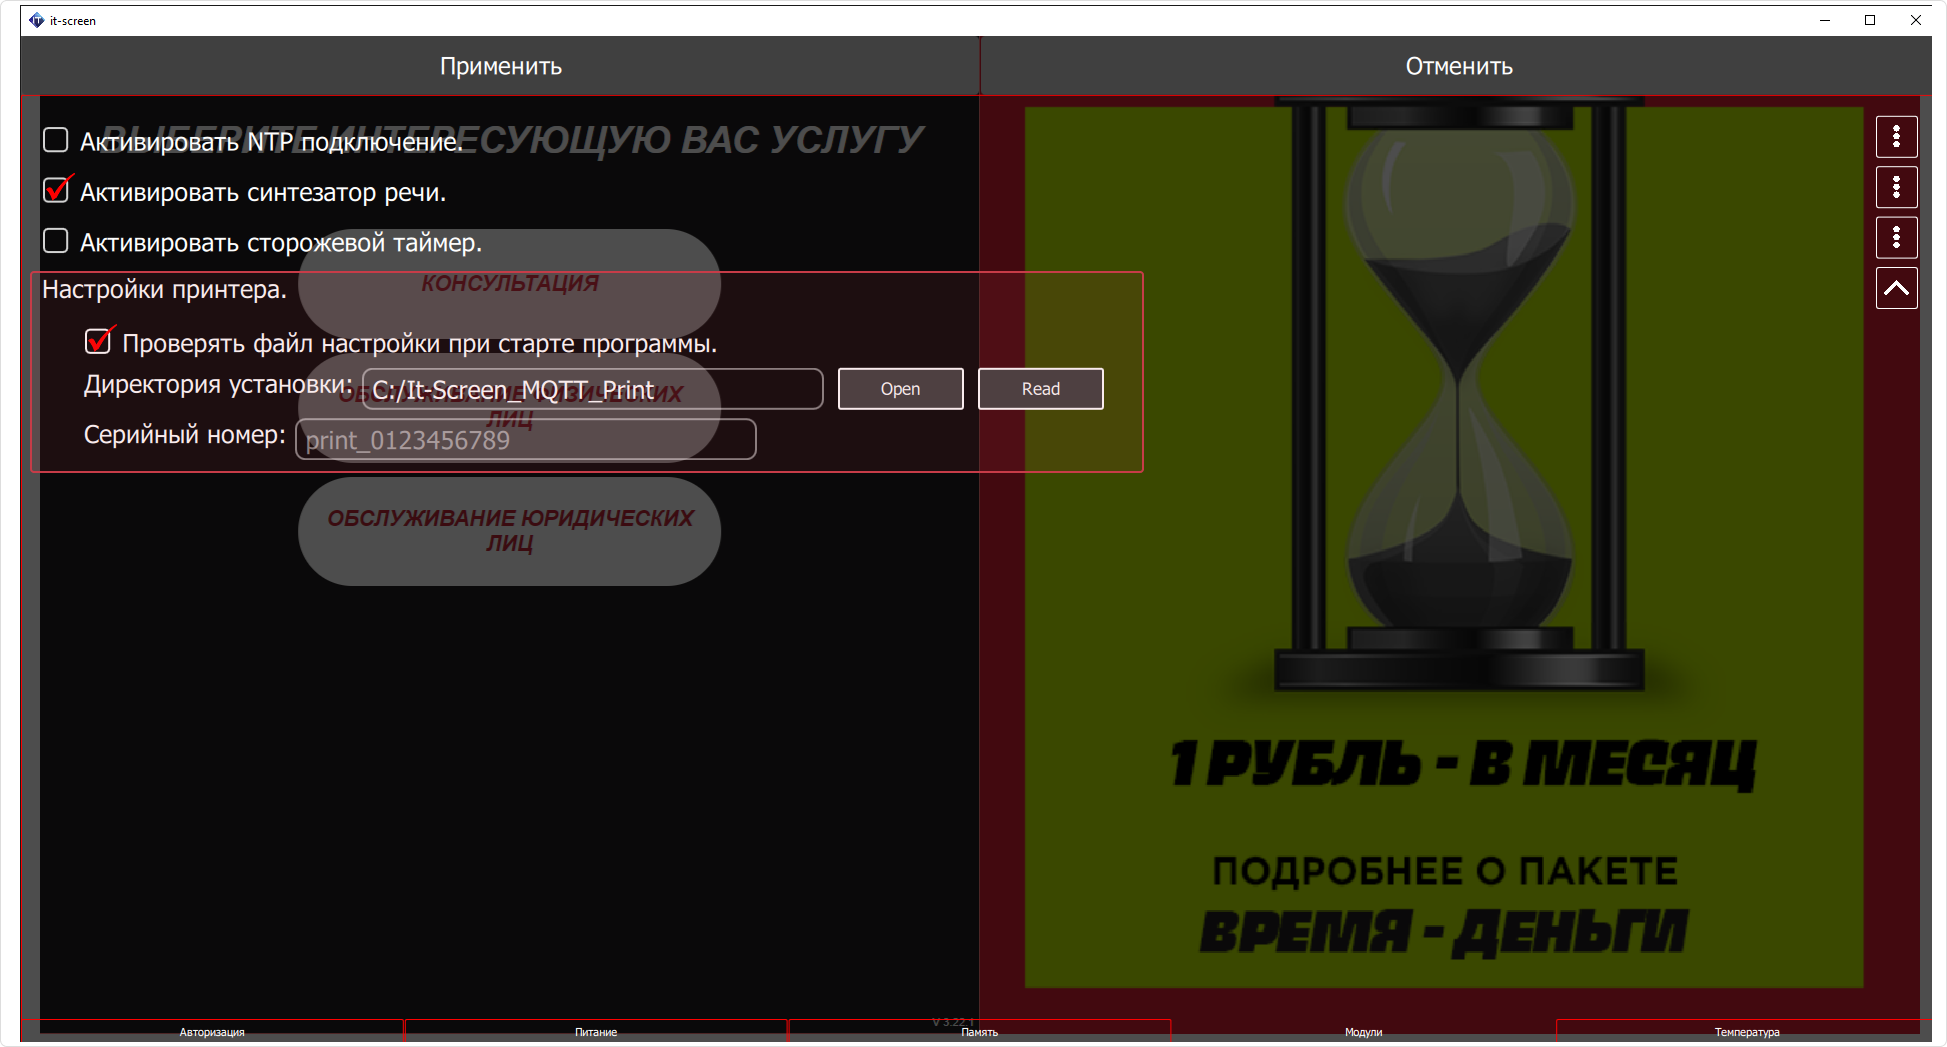
4. The printer ID for the terminal widget is configured in the client application settings of IT-Screen.
5. Font settings (size, type) are configured in the HTML file:
Drive:\It-Screen_MQTT_Print\data\index.html
6. To monitor printing and troubleshoot possible errors, it is recommended to use the application:
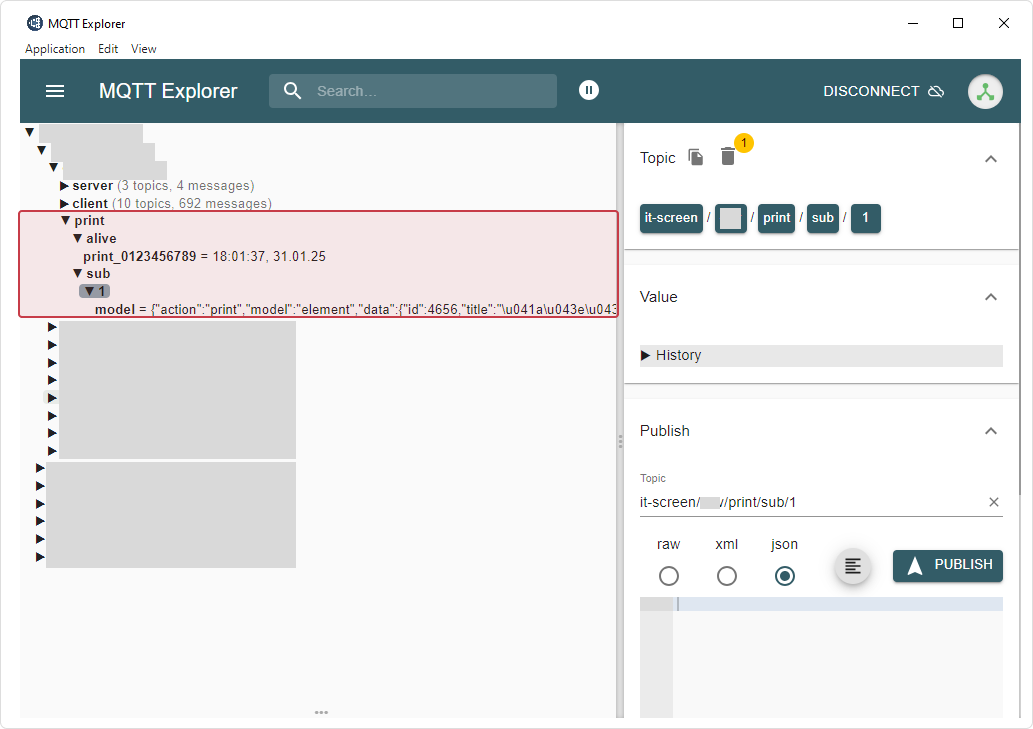
MQTT-Explorer-Setup-0.4.0-beta.6.exe or a newer version.
